DZone
Thanks for visiting DZone today,
Edit Profile
  • Manage Email Subscriptions
  • How to Post to DZone
  • Article Submission Guidelines
Sign Out View Profile
  • Post an Article
  • Manage My Drafts
Over 2 million developers have joined DZone.
Log In / Join
Please enter at least three characters to search
Refcards Trend Reports
Events Video Library
Refcards
Trend Reports

Events

View Events Video Library

Zones

Culture and Methodologies Agile Career Development Methodologies Team Management
Data Engineering AI/ML Big Data Data Databases IoT
Software Design and Architecture Cloud Architecture Containers Integration Microservices Performance Security
Coding Frameworks Java JavaScript Languages Tools
Testing, Deployment, and Maintenance Deployment DevOps and CI/CD Maintenance Monitoring and Observability Testing, Tools, and Frameworks
Culture and Methodologies
Agile Career Development Methodologies Team Management
Data Engineering
AI/ML Big Data Data Databases IoT
Software Design and Architecture
Cloud Architecture Containers Integration Microservices Performance Security
Coding
Frameworks Java JavaScript Languages Tools
Testing, Deployment, and Maintenance
Deployment DevOps and CI/CD Maintenance Monitoring and Observability Testing, Tools, and Frameworks

Modernize your data layer. Learn how to design cloud-native database architectures to meet the evolving demands of AI and GenAI workkloads.

Secure your stack and shape the future! Help dev teams across the globe navigate their software supply chain security challenges.

Releasing software shouldn't be stressful or risky. Learn how to leverage progressive delivery techniques to ensure safer deployments.

Avoid machine learning mistakes and boost model performance! Discover key ML patterns, anti-patterns, data strategies, and more.

  1. DZone
  2. Refcards
  3. Spring Web Flow
refcard cover
Refcard #086

Spring Web Flow

The Essential SWF Cheat Sheet

See how to add Spring Web Flow to a Spring application and define flows that initiate conversations between the application and its users.

Download Refcard
Free PDF for Easy Reference
refcard cover

Written By

author avatar Craig Walls
Principal Consultant, Improving Enterprises
Table of Contents
► About Spring Web Flow ► Distilling Spring Web Flow ► Installing Spring Web Flow ► Defining a Flow ► States ► Transistions ► Subflows
Section 1

About Spring Web Flow

By Craig Walls

Many web sites employ free-form navigation, allowing users to find their own way around. But sometimes it's better for a web application to guide the user around, taking them from one step to the next. A shopping cart on an e-commerce site is a familiar example of an application leading a user instead of the other way around.

Based on Spring MVC, Spring Web Flow is a framework for building flow-based applications. In this Refcard, you'll see how to add Spring Web Flow to a Spring application and define flows that initiate conversations between the application and its users.

Section 2

Distilling Spring Web Flow

All flows are made up of three essential elements: States, Transitions and Flow Data.

States

Within a flow stuff happens. Either the application performs some logic, the user answers a question or fills out a form, or a decision is made to determine the next step to take. The points in the flow where these things happen are known as states.

Spring Web Flow defines five different kinds of state: View, Active, Decision, Subflow, and End. We'll see how all of these states work together to define a flow later in this Refcard.

Transitions

If you think of states as being the cities, scenic points, or truck stops of a flow, then transitions are the highways that connect them. A view state, action state, or subflow state may have any number of transitions that direct them to other states.

Flow Data

As a flow progresses, data is either collected, created, or otherwise manipulated. Depending on the scope of the data, it may be carried around for periods of time to be processed or evaluated within the flow. (I'm tempted to refer to this data as the flow's state, but that the word state is already overloaded, so I'll just call it flow data.)

Flow data can have varying lifespan, depending on which one of five scopes it belongs to. Spring Web Flow's scopes are:

Scope Description
Flow Flow scope is created at the beginning of a flow and is destroyed when the flow ends. Data in flow scope is available to all states within a flow until the flow ends.
Conversation Conversation scope is created at the beginning of a top-level flow and is destroyed when that flow ends. Conversation scope is much like flow scope, except that where flow scope is only available to the flow which it was created in, conversation scope is available to the top-level flow and all of its subflows.
Request Request scope is created at the beginning of an HTTP request and destroyed at the end of the request. Data in request scope is available to all states for the duration of the request (which may span multiple states and even stretch beyond view boundaries).
Flash Flash scope is created when a flow begins, wiped clean when a view is rendered, and destroyed at the end of a flow. Data in flash scope is available to all states within a flow for the duration of the current request. Flash scope differs from request scope in that flash scope will be cleared when a view is rendered, but a request may span multiple views (if a view redirects, for example).
View View scope is created when the flow enters a view state and destroyed when the view is rendered. Because of its short lifespan, data in view scope is only available within the view state that it was created.

The following diagram illustrates the lifespan of each scope:

Web flow scope

Section 3

Installing Spring Web Flow

Adding Spring Web Flow to the Class Path

Adding Spring Web Flow to your application starts with making the Spring Web Flow libraries available in your project's class path. At very least, this means the following JAR files (named as they are distributed in the Spring Web Flow download):

  • org.springframework.Web Flow-2.0.8.RELEASE.jar
  • org.springframework.binding-2.0.8.RELEASE.jar

The Spring Web Flow distribution also comes with two other JAR files that you may find useful:

  • org.springframework.faces-2.0.8.RELEASE.jar
  • org.springframework.js-2.0.8.RELEASE.jar

These libraries support JavaServer Faces and JavaScript/Ajax

integration resepectively. Although these are interesting topics, they are outside of the scope of this Refcard and will not be used.

Spring Web Flow also needs an expression language to help in defining flows. Spring Web Flow uses OGNL (http://www.opensymphony.com/ognl) or the Unified EL as an expression language. For the examples in this Refcard, I'm using OGNL. That means that ognl.jar needs to be in the classpath.

Adding Spring's DispatcherServlet

Spring Web Flow is built upon the foundation of Spring MVC. Therefore, like any Spring MVC web application, all requests enter the application through Spring MVC's DispatcherServlet. To configure DispatcherServlet in your web application, add the following <servlet> to web.xml:

​x
1
​
2
<servlet>
3
<servlet-name>SpringPizza</servlet-name>
4
<servlet-class>org.springframework.web.servlet.DispatcherServlet
5
</servlet-class>
6
<load-on-startup>1</load-on-startup>
7
</servlet>
8
​

You'll also need to indicate which requests should be handled by DispatcherServlet. For our example, DispatcherServlet will be configured to handle requests whose URL pattern (relative to the application context path) is “/app/*”:

6
1
​
2
<servlet-mapping>
3
<servlet-name>SpringPizza</servlet-name>
4
<url-pattern>/app/*</url-pattern>
5
</servlet-mapping>
6
​

Hot Tip

The “/app/*” URL pattern helps keep requests for DispatcherServlet partitioned from requests for other application artifacts, such as images and style sheets. But the “/app” portion may seem like extra noise and you may not want it to be seen by users of the application. To relegate the “/app” portion of the URL to merely an internal implementation detail, I recommend using Paul Tuckey's Url Rewrite Filter (http://tuckey.org/urlrewrite/).

Configuring Spring Web Flow

The next step is to configure Spring Web Flow in the Spring application context. Spring Web Flow's XML configuration namespace makes configuring Spring Web Flow simple work. To use it, add the namespace declaration to the Spring configuration file:

8
1
​
2
<beans xmlns=“http://www.springframework.org/schema/beans” xmlns:xsi=“http://www.w3.org/2001/XMLSchema-instance” 
3
xmlns:flow=“http://www.springframework.org/schema/Web Flow-config” “xsi:schemaLocation=http://www.springframework.org/schema/Web Flow-config
4
http://www.springframework.org/schema/Web Flow-config/spring-Web Flow-config-2.0.xsd http://www.springframework.org/schema/beans
5
http://www.springframework.org/schema/beans/spring-beans-3.0.xsd”>
6
// configuration and beans go here
7
</beans>
8
​

Configuring a Flow Executor

The first bit of Spring Web Flow configuration needed is to wire in the flow executor. Put simply, the flow executor drives the execution of the flow. It is configured in Spring with the <flow:flow-executor> element:

3
1
​
2
<flow:flow-executor id=“flowExecutor” />
3
​

Configuring the Flow Registry

The flows created with Spring Web Flow are defined in separate XML files (using a different namespace than the Spring configuration files). We'll soon see what a flow definition looks like. But first we'll need to tell Spring Web Flow where it can find those flow definition files. For that, we'll configure a flow registry:

5
1
​
2
<flow:flow-registry id=“flowRegistry” base-path=“/WEB-INF/flows”>
3
<flow:flow-location-pattern value=“/**/*-flow.xml” />
4
</Web Flow:flow-registry>
5
​

As shown here, the flow registry is configured to look within the application's /WEB-INF/flows directory (recursively) for any files whose name ends with “-flow.xml”. Those files will define the flows that will be executed by the flow executor.

All flows are given IDs (which are ultimately used to reference the flow). Using the URL pattern given here, the flow ID will be the directory path containing the flow definition file relative to the base path (the part represented with the double-asterisk). The following table illustrates a few examples of how the flow IDs may be derived from the flow location pattern given:

Path to flow definition Flow ID
/WEB-INF/flows/pizza/pizza-flow.xml pizza
/WEB-INF/flows/pizza/some-flow.xml pizza
/WEB-INF/flows/pizza/customer/cust-flow.xml pizza/customer

Another way to control a flow's ID is to leave the base-path off of the <flow:flow-registry> element and to directly identify a specific flow definition file using the <flow:flow-location> element. For example:

5
1
​
2
<flow:flow-registry id=“flowRegistry”>
3
<flow:flow-location path=“/WEB-INF/flows/springpizza.xml” />
4
</Web Flow:flow-registry>
5
​

When the base-path isn't used, the rules for determining the flow ID change so that the base name of the flow definition file becomes the flow ID. In the example given here, the flow ID would be “springpizza”.

Or you can be even more explicit about the flow ID by specifying an id attribute of the <flow:flow-location> element:

5
1
​
2
<flow:flow-registry id=“flowRegistry”>
3
<flow:flow-location id=“pizza” path=“/WEB-INF/flows/springpizza.xml” />
4
</Web Flow:flow-registry>
5
​

In this case, the flow ID would be “pizza”.

Handling Flow Requests

Spring Web Flow provides a Spring MVC handler adapter called FlowHandlerAdapter. This handler adapter is the bridge between DispatcherServlet and the flow executor, handling requests and manipulating the flow based on those requests. To configure FlowHandlerAdapter we need to add the following <bean> declaration:

5
1
​
2
<bean class=“org.springframework.Web Flow.mvc.servlet.FlowHandlerAdapter”>
3
<property name=“flowExecutor” ref=“flowExecutor” />
4
</bean>
5
​

DispatcherServlet knows how to dispatch requests by consulting with one or more handler mappings. For web flows, FlowHandlerMapping helps DispatcherServlet know to send flow requests to the FlowHandlerAdapter:

5
1
​
2
<bean class=“org.springframework.Web Flow.mvc.servlet.FlowHandlerMapping”>
3
<property name=“flowRegistry” ref=“flowRegistry” />
4
</bean>
5
​

Since a web flow application could contain multple flows, the FlowHandlerMapping needs to be wired with a reference to the flow registry so that it knows which flow to send requests to.

Section 4

Defining a Flow

In Spring Web Flow, flows are defined in XML files. But be careful not to confuse Spring Web Flow's flow definition XML files with the configuration we've just done to configure Spring Web Flow within a Spring application context. Flow definitions are kept in separate XML files using a different XML schema. The root of a flow definition XML looks like this:

7
1
​
2
<flow xmlns=“http://www.springframework.org/schema/Web Flow” xmlns:xsi=“http://www.w3.org/2001/XMLSchema-instance”
3
xsi:schemaLocation=“http://www.springframework.org/schema/Web Flow
4
http://www.springframework.org/schema/Web Flow/spring-Web Flow-2.0.xsd”>
5
// flow definition goes here
6
</flow>
7
​

The flow definition schema is rooted with the <flow> element and offers several elements for defining a flow, as listed here:

XML Element Description
<action-state> Performs one or more actions. The outcome of an action may determine the transition to be taken to the next state in the flow.
<attribute> Along with a nested <value> element, <attribute> declares a meta attribute to describe or annotate the flow.
<bean-import> Imports user-defined beans that are resolvable using flow expressions.
<decision-state> Evaluates one or more expressions to decide the next step in the flow.
<end-state> Denotes the final state of a flow. Upon entry to the end state, the flow is terminated.
<exception-handler> Designates a bean that will handle exceptions for this flow.
<global-transitions> Defines one or more transitions that are available from all states.
<input> Declares an input provided by the caller into this flow.
<on-end> Actions to execute when the flow ends.
<on-start> Actions to execute when the flow starts.
<output> Declares an output to be returned to the caller of this flow.
<persistencecontext> Allocates a persistence context when the flow starts. Enables flushing of changes when the flow ends. (Used with a transaction manager wired into a flow execution listener.)
<secured> Used with Spring Security to restrict access to this state given the current user's security attributes.
<subflow-state> Starts another flow as a subflow.
<var> Declares a flow instance variable.
<view-state> A state that involves the user in the flow by presenting them with some output and possibly prompting them for input.

Specifying the Start State

By default, the flow executor starts the flow at the first state it finds in the flow definition XML file. That's a nice convention to follow, but if you'd rather be more explicit about which state begins a flow, then set the start-state attribute on the <flow> element:

9
1
​
2
<flow xmlns=“http://www.springframework.org/schema/Web Flow” 
3
xmlns:xsi=“http://www.w3.org/2001/XMLSchema-instance”
4
xsi:schemaLocation=“http://www.springframework.org/schema/Web Flow
5
http://www.springframework.org/schema/Web Flow/spring-Web Flow-2.0.xsd”
6
start-start=“welcome”>
7
// ...
8
</flow>
9
​
Section 5

States

States are first-class elements of a web flow. As a flow executes, it transitions from one state to another state, performing some action, making some decision, or displaying some output at each step of the way.

As mentioned before, there are five kinds of state in Spring Web Flow. These five states are expressed in a flow definition file using the five XML elements in the following table:

XML Element Description
<action-state> Performs one or more actions. The outcome of an action may determine the transition to be taken to the next state in the flow.
<decision-state> Evaluates one or more expressions to decide the next step in the flow.
<decision-state> Denotes the final state of a flow. Upon entry to the end state, the flow is terminated.
<subflow-state> Starts another flow as a subflow.
<view-state> A state that involves the user in the flow by presenting them with some output and possibly prompting them for input

View States

View states are used to display information to a user or to prompt the user for input. The actual view implementation is usually a JSP page, but can be any view that is supported by Spring MVC. View states are defined in the flow definition XML file with the <view-state> element.

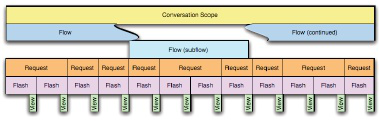
<view-state> Children

<view-state> Child Description
<attribute> Along with a nested <value> element, <attribute> declares a meta attribute to describe or annotate the state.
<binder> Used to configure custom form binding.
<exception-handler> References a <bean> (through the bean attribute) that implements FlowExecutionExceptionHandler that should handle exceptions thrown in this state.
<on-entry> Specifies actions (evaluations, setting of variables, and/or fragment render requests) to be performed upon entry to this state.
<on-exit> Specifies actions (evaluations, setting of variables, and/or fragment render requests) to be performed as exiting this state.
<on-render> Specifies actions (evaluations, setting of variables, and/or fragment render requests) to be performed as rendering this state's view.
<secured> Used with Spring Security to restrict access to this state given the current user's security attributes.
<transition> Defines a path from this state to another state based on an event or exception. May optionally execute one or more actions in the course of the transition.
<var> Declares a view instance variable.

<view-state> Diagram

ViewState Diagram

Defining a simple view state

The simplest possible view state involves only the <view-state> element with its id attribute set:

3
1
​
2
<view-state id=“welcome” />
3
​

With nothing else specified, this view state assumes a logical view name of “welcome” (the same as the state's ID). And, although no transitions are declared here, there may be some global transitions in play allowing the flow to transition away from this state.

Explicitly specifying the view

The convention of assuming a view name that is the same as the view state's ID is convenient. But if you'd rather explicitly specify the view name, then set it via the <view-state>'s view attribute:

3
1
​
2
<view-state id=“welcome” view=“startPage” />
3
​

Transitioning away from a view state

More typically, a view state will have one or more transitions that lead the flow away from the state. Here's the “welcome” state with two transitions defined:

6
1
​
2
<view-state id=“welcome”>
3
<transition to=“lookupCustomer” on=“phoneEntered” />
4
<transition to=“endState” on=“cancel” />
5
</view-state>
6
​

The to attribute of the <transition> element indicates the state to which the flow should transition after this state. The on attribute specifies the name of an event that should trigger the transition. In this case, the flow will transition to the “lookupCustomer” state if a “phoneEntered” event occurs in this state; or to the “endState” state if a “cancel” event is encountered.

Leaving off the on attribute causes a transition to take place regardless of what event occurs.

5
1
​
2
<view-state id=“thankYou”>
3
<transition to=“endState” />
4
</view-state>
5
​

In this case, the next stop after the “thankYou” view state will always be the state whose ID is “endState”.

Firing events from the view

Events can be fired from the view in one of three ways.

1. With a simple link:

3
1
​
2
<a href=“${flowExecutionUrl}&_eventId=finished”>Finish</a>
3
​

Spring Web Flow provides the ${flowExecutionUrl} variable with a URL path to the flow. The _eventId parameter specifies the event to be triggered.

2. Passing the event ID in a hidden field:

7
1
​
2
<form:form>
3
<input type=“hidden” name=“_flowExecutionKey” value=“${flowExecutionKey}” />
4
<input type=“hidden” name=“_eventId” value=“finished” />
5
<input type=“submit” value=“Finished” />
6
</form:form>
7
​

3. Specified in the name of a submit button:

6
1
​
2
<form:form>
3
<input type=“hidden” name=“_flowExecutionKey” value=“${flowExecutionKey}” />
4
<input type=“submit” name=“_eventId_finished” value=“Finished” />
5
</form:form>
6
​

Take notice of how the name of the submit button is structured. Rather than just name it with the event ID, the event ID is prefixed with “_eventId_”.

Action States

Whereas view states offer the users of the application to be involved in the flow, action states are where the application itself goes to work. Action states are defined by the <actionstate> element.

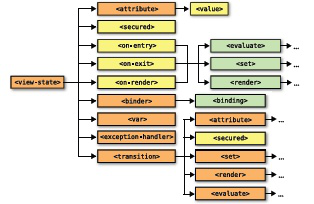
<action-state> Children

<action-state> Child Description
<attribute> Along with a nested <value> element, <attribute> declares a meta attribute to describe or annotate the state.
<evaluate> Evaluates an expression, optionally assigning it to a variable.
<exception-handler> References a <bean> (through the bean attribute) that implements FlowExecutionExceptionHandler that should handle exceptions thrown in this state.
<on-entry> Specifies actions (evaluations, setting of variables, and/or fragment render requests) to be performed upon entry to this state.
<on-exit> Specifies actions (evaluations, setting of variables, and/or fragment render requests) to be performed as exiting this state.
<render> Requests that the next view render a fragment of content.
<secured> Used with Spring Security to restrict access to this state given the current user's security attributes.
<set> Sets a variable in one of the flow's scopes.
<transition> Defines a path from this state to another state based on an event or exception. May optionally execute one or more actions in the course of the transition.

<action-state> Diagram

ActionState Diagram

Defining a simple action state

As their name suggests, action states do something. The way to prescribe what action states do is through a nested <evaluate> element:

6
1
​
2
<action-state id=“addCustomer”>
3
<evaluate expression=“pizzaFlowActions.addCustomer(order.customer)” />
4
<transition to=“customerReady” />
5
</action-state>
6
​

The expression attribute is given an expression. Here the customer property of the flow-scoped order is passed into the addCustomer() method of a spring bean whose ID is “pizzaFlowActions”.

Transitioning on action evaluation

Ultimately, the value returned from the evaluation becomes the event ID that triggers a transition. For example, consider the following action state:

7
1
​
2
<action-state id=“cancelOrder”>
3
<evaluate expression=“pizzaFlowActions.cancelOrder(phoneNumber)” />
4
<transition to=“endState” on=“orderCancelled” />
5
<transition to=“cancelForm” on=“orderNotFound” />
6
</action-state>
7
​

In this case, if the cancelOrder() method returns “orderCancelled”, then the flow will transition to the state whose ID is “endState”. But if the method returns “orderNotFound”, then the flow transitions to “cancelForm” so that the user can specify a different phone number.

Hot Tip

You can specify multiple evaluations within an action state. Be aware, however, that Spring Web Flow will evaluate each evaluation in order and stop when a transition trigger is fired. If the result of the first evaluation is an event that is handled by one of the transitions (including global transitions), then the remaining evaluations will never be evaluated.
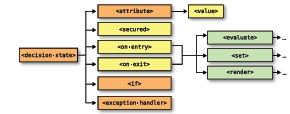
Decision States

Decision states represent a binary branch in the flow based on the result of evaluating a boolean expression. Decision states are defined by the <decision-state> element.

<decision-state> Children

<decision-state> Child Description
<attribute> Along with a nested <value> element, <attribute> declares a meta attribute to describe or annotate the state.
<exception-handler> References a <bean> (through the bean attribute) that implements FlowExecutionExceptionHandler that should handle exceptions thrown in this state.
<if> Specifies a boolean expression and a state to transition to if the expression evaluates to true. Optionally may specify a state to transition to if the expression evaluates to false.
<on-entry> Specifies actions (evaluations, setting of variables, and/or fragment render requests) to be performed upon entry to this state.
<on-exit> Specifies actions (evaluations, setting of variables, and/or fragment render requests) to be performed as exiting this state.
<secured> Used with Spring Security to restrict access to this state given the current user's security attributes.

<decision-state> Diagram

DecisionState Diagram

The <if> element is the heart of a decision state. It evaluates a boolean expression and then transitions to another state depending on whether or not the expression is true or false.

5
1
​
2
<decision-state id=“checkDeliveryArea”>
3
<if test=“pizzaFlowActions.isInDeliveryArea(customer.zipCode)” then=“addCustomer” else=“warnDeliveryUnavailable” />
4
</decision-state>
5
​

If the isInDeliveryArea() returns true, then the flow will transition to the “addCustomer” state. Otherwise, the flow will transition to the “warnDeliveryUnavailable” state.
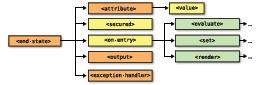
End States

All flows must eventually come to an end. That's what the end state is for. End states are defined by the <end-state> element.

<end-state> Children

<end-state> Child Description
<attribute> Along with a nested <value> element, <attribute> declares a meta attribute to describe or annotate the state.
<exception-handler> References a <bean> (through the bean attribute) that implements FlowExecutionExceptionHandler that should handle exceptions thrown in this state.
<on-entry> Specifies actions (evaluations, setting of variables, and/or fragment render requests) to be performed upon entry to this state.
<output> Declares the output of a flow. Useful for passing state out of a subflow to the invoking flow.
<secured> Used with Spring Security to restrict access to this state given the current user's security attributes.

<end-state> Diagram

EndState Diagram

In it's simplest (and most common) form, an end state takes the following form:

3
1
​
2
<end-state id=“endState”/>
3
​

An end state that is defined like this simply ends the flow. Upon flow termination, the user will be taken to the beginning of the flow, starting a new instance of the flow.

Alternatively, the end state could navigate out of the flow to some other URL. All you need to do is specify the view attribute.

3
1
​
2
<end-state id=“endState” view=“/homePage.jsp” />
3
​

In this case, the flow will end and the user will be sent to the page whose URL is “/homePage.jsp” (relative to the context path).

If a Spring MVC view resolver is registered in the Spring application context, a logical view name can be used instead of an explicit view file path:

3
1
​
2
<end-state id=“endState” view=“homePage” />
3
​
Section 6

Transistions

We've already seen a few examples of transitions earlier in this Refcard. Here are a few more things you may want to do with a transition.

Exception-Triggered Transitions

In addition to transitioning in response to an event, it's also possible to transition in response to an exception being thrown by setting <transaction>'s on-exception attribute to the fullyqualified name of the exception that should trigger the transition.

7
1
​
2
<action-state id=“lookupCustomer”>
3
<evaluate result=“order.customer” expression=“pizzaFlowActions.lookupCustomer(requestParameters.phoneNumber)” />
4
<transition to=“registrationForm” on-exception=“com.springinaction.pizza.service.CustomerNotFoundException” />
5
<transition to=“customerReady” />
6
</action-state>
7
​

Performing Evaluations on Transition

If you'd like to perform some evaluation while leaving a state, you can specify that evaluation as part of the state's <on-exit>.

10
1
​
2
<view-state id=“createPizza” model=“flowScope.pizza”>
3
...
4
<on-exit>
5
<evaluate expression=“order.addPizza(flowScope.pizza)” />
6
</on-exit>
7
<transition on=“addPizza” to=“showOrder” />
8
<transition on=“cancel” to=“showOrder” />
9
</view-state>
10
​

But the evaluations in <on-exit> will occur regardless of which transition is taken to leave that state.

If you want an evaluation to only happen for a specific transition, you can specify the evaluation within the <transition> element itself:

9
1
​
2
<view-state id=“createPizza” model=“flowScope.pizza”>
3
...
4
<transition on=“addPizza” to=“showOrder”>
5
<evaluate expression=“order.addPizza(flowScope.pizza)” />
6
</transition>
7
<transition on=“cancel” to=“showOrder” />
8
</view-state>
9
​

Declaring Global Transitions

You may find that you have some common transitions that are applicable to all states within a flow. A transition to end the flow upon a “cancel” event is such a transition. Rather than declare the “cancel” transition in each state, you can declare it as a global transition:

5
1
​
2
<global-transitions>
3
<transition on=“cancel” to=“endState” />
4
</global-transitions>
5
​
Section 7

Subflows

Subflows are expressed in much the same way as any other flow. In fact, most subflows can stand on their own as a full-fledged flow. To call subflows, the <subflow-state> element represents the state in a top-level flow where the subflow takes over.

Calling Subflows

The simplest form of a subflow call involves a subflow-state with only an id and a subflow attribute:

3
1
​
2
<subflow-state id=“customer” subflow=“customer” />
3
​

As with any other kind of state, the id attribute identifies the subflow state so that other states can transition to it. The subflow attribute identifies the subflow to be called by its flow ID.

Transitioning Away From a Subflow

The previous example of a subflow doesn't include any transitions. Perhaps one or more global transitions are in effect and thus there's no need for the state to declare its own transitions. But just like action states and view states, subflow states can declare transitions:

6
1
​
2
<subflow-state id=“customer” subflow=“customer”>
3
<transition on=“cancel” to=“endState” />
4
<transition on=“customerReady” to=“order” />
5
</subflow-state>
6
​

When a flow ends, it fires an event that is the same as the end state's ID. For example, consider these <end-state> declarations.

4
1
​
2
<end-state id=“cancel” />
3
<end-state id=“customerReady” />
4
​

If the Flow ends on the “cancel” end state, then a “cancel” event will be fired. Otherwise a “customerReady” event will be fired.

Passing Input to a Subflow

To pass input to a subflow, simply provide the <input> element within the <subflow-state>:

5
1
​
2
<subflow-state id=“customer” subflow=“customer”>
3
<input name=“order” value=“order” />
4
</subflow-state>
5
​

Here we're telling the flow to pass the value of the “order” variable to the subflow under the name “order”. Then, within the subflow definition, declare the input within the flow:

5
1
​
2
<subflow-state id=“customer” subflow=“customer”>
3
<input name=“order” value=“order” />
4
</subflow-state>
5
​

Within the subflow the parameter will be known as “order”. The required attribute indicates that the parameter is required and, if it is not passed in or if the value passed in is null, then an error will be raised.

Returning Data From Subflows

To return data from a subflow declare what is to be returned with the <output> element.

3
1
​
2
<output name=“customer” value=“customer” />
3
​

Optionally, you may want to return different values depending on which <end-state> ends the flow. In that case declare the <output> element within the <end-state>:

5
1
​
2
<end-state id=“customerReady”>
3
<output name=“customer” value=“customer” />
4
</end-state>
5
​

On the calling side, prepare the subflow state to receive the subflow's output by declaring the <output> element within the <subflow-state> element:

5
1
​
2
<subflow-state id=“customer” subflow=“customer”>
3
<output name=“customer” />
4
</subflow-state>
5
​

Like This Refcard? Read More From DZone

related article thumbnail

DZone Article

Migrate from Struts to Spring MVC in 6 Steps
related article thumbnail

DZone Article

SSL-Based REST Web Service in Java JAX-RS With Spring
related article thumbnail

DZone Article

5 Essential Requirements for a Spring Boot Application in Production
related article thumbnail

DZone Article

How to Convert XLS to XLSX in Java
related refcard thumbnail

Free DZone Refcard

GraphQL Essentials
related refcard thumbnail

Free DZone Refcard

API Integration Patterns
related refcard thumbnail

Free DZone Refcard

Getting Started With Cross-Platform Heterogeneous Computing
related refcard thumbnail

Free DZone Refcard

Introduction to Digital Asset Management via APIs

ABOUT US

  • About DZone
  • Support and feedback
  • Community research
  • Sitemap

ADVERTISE

  • Advertise with DZone

CONTRIBUTE ON DZONE

  • Article Submission Guidelines
  • Become a Contributor
  • Core Program
  • Visit the Writers' Zone

LEGAL

  • Terms of Service
  • Privacy Policy

CONTACT US

  • 3343 Perimeter Hill Drive
  • Suite 100
  • Nashville, TN 37211
  • support@dzone.com

Let's be friends: