DZone
Thanks for visiting DZone today,
Edit Profile
  • Manage Email Subscriptions
  • How to Post to DZone
  • Article Submission Guidelines
Sign Out View Profile
  • Post an Article
  • Manage My Drafts
Over 2 million developers have joined DZone.
Log In / Join
Please enter at least three characters to search
Refcards Trend Reports
Events Video Library
Refcards
Trend Reports

Events

View Events Video Library

Zones

Culture and Methodologies Agile Career Development Methodologies Team Management
Data Engineering AI/ML Big Data Data Databases IoT
Software Design and Architecture Cloud Architecture Containers Integration Microservices Performance Security
Coding Frameworks Java JavaScript Languages Tools
Testing, Deployment, and Maintenance Deployment DevOps and CI/CD Maintenance Monitoring and Observability Testing, Tools, and Frameworks
Culture and Methodologies
Agile Career Development Methodologies Team Management
Data Engineering
AI/ML Big Data Data Databases IoT
Software Design and Architecture
Cloud Architecture Containers Integration Microservices Performance Security
Coding
Frameworks Java JavaScript Languages Tools
Testing, Deployment, and Maintenance
Deployment DevOps and CI/CD Maintenance Monitoring and Observability Testing, Tools, and Frameworks

Modernize your data layer. Learn how to design cloud-native database architectures to meet the evolving demands of AI and GenAI workkloads.

Secure your stack and shape the future! Help dev teams across the globe navigate their software supply chain security challenges.

Releasing software shouldn't be stressful or risky. Learn how to leverage progressive delivery techniques to ensure safer deployments.

Avoid machine learning mistakes and boost model performance! Discover key ML patterns, anti-patterns, data strategies, and more.

  1. DZone
  2. Refcards
  3. Getting Started with Maven Repository Management
refcard cover
Refcard #098

Getting Started with Maven Repository Management

The Ultimate Solution for Codebase Management

Begin learning about Maven Repository Management, covering proxy repositories, hosted repositories, and repository groups.

Download Refcard
Free PDF for Easy Reference
refcard cover

Written By

author avatar Jason van Zyl
,
Table of Contents
► Maven Repository Management ► Project Dependencies ► Remote Repositories ► About Nexus ► Running Nexus ► Configuring Maven for Nexus ► Proxy Repositories ► Hosted Repositories ► Repository Groups ► Nexus Administration ► Nexus Professional ► Other Nexus Resources
Section 1

Maven Repository Management

By Jason Van Zyl

A Maven repository provides a standard for storing and serving binary software. Maven and other tools such as Ivy interact with repositories to search for binary software artifacts, locate project dependencies, and retrieve software artifacts from a repository.

Maven Repository managers serve two purposes: they act as highly configurable proxies between your organization and the public Maven repositories and they also provide an organization with a deployment destination for your own generated artifacts.

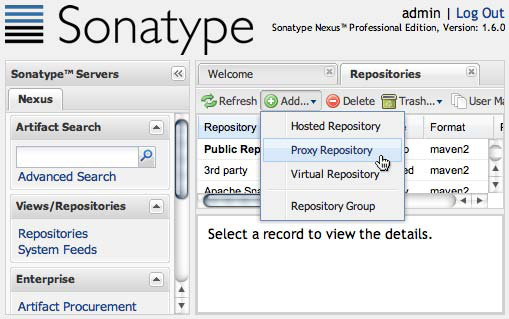
Proxy Remote Repositories

When you proxy a remote repository, you repository manager accepts requests for artifacts from clients. If the artifact is not already cached, the repository manager will retrieve the artifact from the remote repository and cache the artifact. Subsequent requests for the same artifact will be served from the local cache.

cache

Hosted Internal Repositories

When you host a repository, your repository manager takes care of organizing, storing, and serving binary artifacts. You can use a hosted, internal repository to store internal release artifacts, snapshot artifacts, or 3rd party artifacts.

artifacts

Release Artifacts

These are specific, point-in-time releases. Released artifacts are considered to be solid, stable, and perpetual in order to guarantee that builds which depend upon them are repeatable over time. Released JAR artifacts are associated with PGP signatures and checksums verify both the authenticity and integrity of the binary software artifact. The Central Maven repository stores release artifacts.

Snapshot Artifacts

Snapshots capture a work in progress and are used during development. A Snapshot artifact has both a version number such as “1.3.0” or “1.3” and a timestamp. For example, a snapshot artifact for commons-lang 1.3.0 might have the name commons-lang-1.3.0-20090314.182342-1.jar.

Reasons to Use a Repository Manager

  • Builds will run much fasteras they will be downloading artifacts from a local cache.
  • Builds will be more stablebecause you will not be relying on external resources. If your internet connection becomes unavailable, your builds will rely on a local cache of artifacts from a remote repository.
  • You can deploy 3rd party artifacts to your repository manager. If you have a proprietary JDBC driver, add it to an internal 3rd party repository so developers can add it as a project dependency without having to manually install it in a local repository.
  • It will be easier to collaborateand distribute software internally. Instead of sending other developers instructions for checking out source from source control and building entire applications from source, publish artifacts to an internal repository and share binary artifacts.
  • If you are deploying software to the public, the fastest way to get your users productive is with a standard Maven repository.
  • You can control which artifacts and repositories are referenced by your projects.

Additional Features and Benefits

Searching and Indexing Artifacts:All repository managers provide an easy way to index and search software artifacts using the standard Nexus Indexer format.

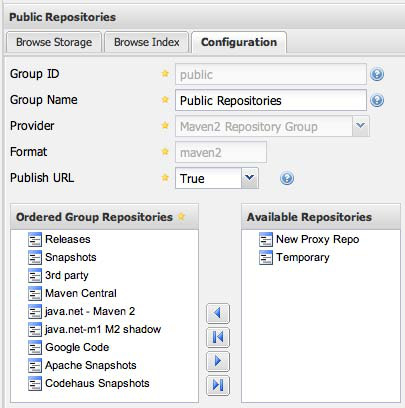
Repository Groups:Repository managers can consolidate multiple repositories into a single repository group making it easier to configure tools to retrieve artifacts from a single URL.

Repository

Procuring External Artifacts:Organizations often want some control over what artifacts are allowed into the organization. Many repository managers allow administrators to define lists of allowed and/or blocked repositories.

Staging and Release Management:Repository managers can also support decisions and workflow associated with software releases sending email notifications to release managers, developers, and testers.

Release Management

Security and LDAP Integration:Repository managers can be configured to verify artifacts downloaded from remote repositories and to integrate with external security providers such as LDAP.

Multiple Repository Formats:Repository managers can also automatically transform between various repository formats including OSGi Bundle repositories (OBR), P2 repositories, Maven repositories, and other repository formats.

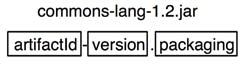
REPOSITORY COORDINATES

Repositories store artifacts using a set of coordinates: groupId, artifactId, version, and packaging. The GAV coordinate standard is the foundation for Maven’s ability to manage dependencies.

Hot Tip

This set of coordinates is often referred to as a GAV coordinate, which is short for “Group, Artifact, Version coordinate.”

Coordinate: groupId

A group identifier groups a set of artifacts into a logical group. For example, software components being produced by the Maven project are available under the groupId org.apache.maven.

Coordinate: artifactId

An artifact is simply a name for a software artifact. A simple web application project might have the artifactId “simple-webapp”, and a simple library might be “simple-library”. The combination of groupId and artifactId must be unique for a project.

Coordinate: version

A numerical version for a software artifact. For example, if your simple-library artifact has a Major release version of 1, a minor release version of 2, and point release version of 3, your version would be 1.2.3. Versions can also contain extra information to denote release status such as “1.2-beta”.

Coordinate: packaging

Packaging describes the contents of the software artifact. While the most common artifact is a JAR, Maven repositories can store any type binary software format including ZIP, SWC, SWF, NAR, WAR, EAR, SAR.

Addressing Resources in a Repository

Tools designed to interact with Maven repositories translate artifact coordinates into a URL which corresponds to a location in a Maven repository. If a tool such as Maven is looking for version 1.2.0 of the some-library JAR in the group com.example, this request is translated into:

​x
1
​
2
/com/example/some-library/1.2.0/some-library-1.2.0.jar
3
/com/example/some-library/1.2.0/some-library-1.2.0.pom
4
​

pg2

Section 2

Project Dependencies

Build tools like Maven and Ivy allow you to define project dependencies using Maven coordinates.

Declaring Dependencies in Maven

19
1
​
2
<project>
3
...
4
  <dependencies>
5
  <dependency>
6
      <groupId>org.codehaus.xfire</groupId>
7
      <artifactId>xfire-java5</artifactId>
8
      <version>1.2.5</version>
9
  </dependency>
10
  <dependency>
11
    <groupId>junit</groupId>
12
      <artifactId>junit</artifactId>
13
     <version>3.8.1</version>
14
     <scope>test</scope>
15
    </dependency>
16
</dependencies>
17
...
18
</project>
19
​
Section 3

Remote Repositories

Central Maven Repository

The Central Maven repository contains almost 90,000 software artifacts occupying around 100 GB of disk space. You can look at Central as an example of how Maven repositories operate and how they are assembled.

Apache Snapshot Repository

The Apache Snapshot repository contains snapshot artifacts for projects in the Apache Software Foundation. http://repository.apache.org/snapshots/

Codehaus Snapshot Repository

The Codehaus Snapshot repository contains snapshot artifacts for projects hosted by Codehaus. http://nexus.codehaus.org/snapshots/

Section 4

About Nexus

Nexus manages software “artifacts” required for development, deployment, and provisioning. If you develop software, Nexus can help you share those artifacts with other developers and end-users. Maven’s central repository has always served as a great convenience for users of Maven, but it has always been recommended to maintain your own repositories to ensure stability within your organization. Nexus greatly simplifies the maintenance of your own internal repositories and access to external repositories. With Nexus you can completely control access to, and deployment of, every artifact in your organization from a single location.

Downloading Nexus Open Source

To download Nexus Open Source, go to http://nexus.sonatype.org and click on the Download menu item. Download the nexus-oss-webapp-1.6.0-bundle.tar.gz or nexus-oss-webapp-1.6.0-bundle.zip file from the Download directory.

Downloading Nexus Professional

To download Nexus Professional, go to http://www.sonatype.com/products/nexus and click on Download Nexus Pro. After you fill out a simple registration form, a download link will be sent via email.

Installing Java

Nexus Open Source and Nexus Professional only have one prerequisite, a Java Runtime Environment (JRE) compatible with Java 5 or higher. To download the latest release of the Sun JDK, go to http://developers.sun.com/downloads/.

Installing Nexus

Unpack the Nexus distribution in any directory. Nexus doesn’t have any hard coded directories, it will run from any directory. If you downloaded the ZIP archive, run:

3
1
​
2
$ unzip nexus-webapp-1.6.0-bundle.zip
3
​

And, if you downloaded the GZip’d TAR archive, run:

3
1
​
2
$ tar xvzf nexus-webapp-1.6.0-bundle.tgz
3
​

This will create two directories nexus-webapp-1.6.0/ and sonatype-work/.

The Sonatype Work Directory

The Nexus installation directory nexus-webapp-1.6.0 has a sibling directory named sonatype-work/. This directory contains all of the repository and configuration data for Nexus and is stored outside of the Nexus installation directory to make it easier to upgrade to a newer version of Nexus.

Section 5

Running Nexus

When you start Nexus for the first time, it will be running on http://localhost:8081/nexus/. To start Nexus, find the appropriate startup script for your platform in the ${NEXUS_HOME}/bin/jsw directory.

Starting Nexus

The following example listing starts Nexus using the script for Mac OS X. The Mac OS X wrapper is started with a call to nexus start:

14
1
​
2
$ cd ~/nexus-webapp-1.6.0
3
$ ls ./bin/jsw/
4
aix-ppc-32/ linux-ppc-64/ solaris-sparc-32/
5
aix-ppc-64/ linux-x86-32/ solaris-sparc-64/
6
hpux-parisc-32/ linux-x86-64/ solaris-x86-32/
7
hpux-parisc-64/ macosx-universal-32/ windows-x86-32/
8
$ chmod -R a+x bin
9
$ ./bin/jsw/macosx-universal-32/nexus start
10
Nexus Repository Manager...
11
$ tail -f logs/wrapper.log
12
INFO ... [ServletContainer:default] -SelectChannelConnector@0.0.0.0:8081
13
​
14
​

Configuring Nexus as a Service

When installing Nexus, you will often want to configure Nexus as a service. To configure Nexus as a service on Windows:

  • (A) Open a Command Prompt
  • (B) Change directories to C:/Program Files/nexus-webapp-1.6.0
  • (C) Change directories to bin/jsw/windows-x86-32
  • (D) Run InstallNexus.bat to install Nexus as a Windows Service
  • (E) Run “net start nexus-webapp” to start the Nexus service

To configure Nexus as a service on Linux:

  • (A) Copy bin/jsw/$PLATFORM/nexus to /etc/init.d
  • (B) chmod 755 /etc/init.d/nexus
  • (C) Edit the startup script changing APP_NAME, APP_LONG_NAME, NEXUS_HOME, PLATFORM, WRAPPER_CMD, and WRAPPER_CONF
  • (D) (Optional) Set the RUN_AS_USER to “nexus

Login to Nexus

To use Nexus, fire up a web browser and go to: http://localhost:8081/nexus. Click on the “Log In” link in the upper right-hand corner of the web page, and you should see the login dialog.

login

Hot Tip

THE DEFAULT NEXUS USERNAME AND PASSWORD IS “admin” AND “admin123”.

Post-install Checklist

After installing Nexus make sure to make the following configuration changes.

  • Change the Administrative Password by clicking on Security -> Users. Right-click on the admin user and choose “Set Password”.
  • Configure the SMTP Settings by selecting Administration -> Server and filling out the SMTP server information.
  • Enable Remote Index Downloads for the Central Maven Repository. Click on Views/Repositories -> Repositories. Select the “Maven Central” repository and open up the Configuration tab. Under Remote Repository Access set Download Remote Indexes to true.
  • Install Professional License (Nexus Professional Only). Select Administration -> Licensing and upload your Nexus Professional License.
Section 6

Configuring Maven for Nexus

To use Nexus, you will configure Maven to check Nexus instead of the public repositories. To do this, you’ll need to edit your mirror settings in your ~/.m2/settings.xml file.

Update your Maven Settings

Place the following XML into a file named ~/.m2/settings. xml. This Maven Settings file configures your Maven builds to fetch artifacts from the public group of the Nexus installation available at http://localhost:8081/nexus/

37
1
​
2
<settings>
3
 <mirrors>
4
  <mirror>
5
   <!--This sends everything else to /public -->
6
   <id>nexus</id>
7
   <mirrorOf>*</mirrorOf>
8
   <url>http://localhost:8081/nexus/content/groups/public</url>
9
  </mirror>
10
 </mirrors>
11
<profiles>
12
 <profile>
13
  <id>nexus</id>
14
  <repositories>
15
   <repository>
16
    <id>central</id>
17
     <url>http://central</url>
18
     <releases><enabled>true</enabled></releases>
19
     <snapshots><enabled>true</enabled></snapshots>
20
    </repository>
21
   </repositories>
22
 <pluginRepositories>
23
  <pluginRepository>
24
   <id>central</id>
25
    <url>http://central</url>
26
     <releases><enabled>true</enabled></releases>
27
     <snapshots><enabled>true</enabled></snapshots>
28
    </pluginRepository>
29
   </pluginRepositories>
30
 </profile>
31
</profiles>
32
  <activeProfiles>
33
   <!--make the profile active all the time -->
34
    <activeProfile>nexus</activeProfile>
35
  </activeProfiles>
36
</settings>
37
​

Deploying Artifacts to Nexus

To deploy artifacts to Nexus you must set server credentials in your Maven Settings and configure your project’s POM to publish to Nexus. Using the default deployment user’s credentials, put the following server element in your Maven Settings XML stored in ~/.m2/settings.xml

18
1
​
2
<settings>
3
…
4
<servers>
5
<server>
6
   <id>releases</id>
7
   <username>deployment</username>
8
   <password>deployment123</password>
9
 </server>
10
<server>
11
   <id>snapshots</id>
12
   <username>deployment</username>
13
   <password>deployment123</password>
14
<</server>
15
</servers>
16
…
17
</settings>
18
​

And, add the following XML to your Maven project’s pom.xml:

18
1
​
2
<distributionManagement>
3
  <repository>
4
     <id>releases</id>
5
     <name>Releases Repository</name>
6
     <url>
7
  http://localhost:8081/nexus/content/repositories/releases
8
</url>
9
  </repository>
10
    <snapshotRepository>
11
    <id>snapshots</id>
12
   <name>Snapshot Repository</name>
13
 <url>
14
http://localhost:8081/nexus/content/repositories/snapshots
15
  </url>
16
  </snapshotRepository>
17
</distributionManagement>
18
​

This configures your Maven build to deploy snapshots to the hosted Snapshots repository and releases to the hosted Releases repository. When Maven performs the deployment, it will match the id element of the repository with the id element of the server in the settings.xml and send the appropriate credentials.

Hot Tip

The default deployment user is deployment and the default password is deployment123.
Section 7

Proxy Repositories

This section details working with Proxy Repositories.

What is a Proxy Repository?

A proxy repository sits between your builds and a remote repository like the Central Maven repository. When you ask a proxy repository for an artifact, it checks a local cache of artifacts it has already downloaded. If it does not have the artifact requested, it will retrieve the artifact from the remote repository.

Proxy repositories speed up your builds by serving frequently used artifacts from a local cache. They also provide for more stability in case when your internet connection or the remote repository becomes unavailable.

Adding a New Proxy Repository

To add a new Proxy Repository, go to Views/Repositories -> Repositories, and click on the Add button as shown in the following figure. Select Proxy Repository from the drop down:

Proxy

Once you select Proxy Repository you will see the New Proxy Repository form shown here:

Proxy Form

Supply a unique identifier and name, choose a Repository Policy of either Release or Snapshot, and provide the URL of the remote repository in the Remote Storage Location.

Enabling Remote Index Downloads

While Nexus is preconfigured with the Central Maven repository, it is not configured to download indexes from remote repositories. Enabling indexes is essential if you want to take full advantage of Nexus’ intuitive search interface. To enable Remote Index Downloads. Go to Views/Repositories -> Repositories. Select the Maven Central repository and click on the Configuration tab. Set “Download Remote Indexes” to true and click on Save. Nexus will then download the repository index from the remote repository. This process may take a few minutes depending on the speed of your connection.

If the remote index has been successfully downloaded and processed, the Browse Index tab for the Maven Central repository will display thousands of artifacts.

Section 8

Hosted Repositories

What is a Hosted Repository?

A Hosted Repository contains artifacts which have been published to a Nexus instance. These published artifacts are stored in the Sonatype Work directory. This can include repositories that hold release artifacts and repositories that hold snapshot artifacts.

Nexus comes configured with three Hosted repositories: 3rd Party, Releases, and Snapshots. The Releases repository is for your own internal software release artifacts, and the Snapshots repository is for your own project’s snapshot artifacts. The 3rd Party repository is for 3rd party artifacts such as proprietary drivers or commercial libraries which are not available from a public Maven repository.

Adding a New Hosted Repository

Proxy Repository

Section 9

Repository Groups

What is a Repository Group?

A repository groups combines one or more repositories under a single repository URL. You use repository groups to simplify the configuration of tools like Maven which need to retrieve artifacts from a set of common repositories. As a Nexus administrator you can define new repositories, control which repositories are available in a group and the order in which artifacts are resolved from repositories in a group.

Adding Repositories to a Group

Nexus ships with a Public Repository Group which contains all of your hosted and proxy repositories. If you create a new repository, and you need to add this repository to the Public Group, go to Views/Repositories -> Repositories and select the Configuration tab.

Config Tab

To add a repository to repository group, drag a repository from the “Available Repositories” list to the “Ordered Group Repositories” list and click on the Save button.

Reordering Repositories in a Group

When Nexus resolves an artifact from a Repository Group it iterates over the repositories in the group, returning the first match. If an artifact exists in more than one repository, you may need to change the order of repositories in a Repository Group. To change the order, go to Repositories/View -> Repositories, select the group you need to reorder, and then select the Configuration tab. To reorder repositories, click and drag repositories to the correct order in the Ordered Group Repositories field and then click Save.

Section 10

Nexus Administration

Configuring Nexus Server

To configure Sonatype Nexus, click on Administration -> Server this will load the Nexus configuration panel. The following is a list of some of the configuration sections in this panel:

SMTP Settings: Nexus supports release and deployment using email. Before Nexus can send emails, you will need to configure the appropriate SMTP settings in this section.

HTTP Request Settings: Configure custom timeouts and retry behavior for remote repositories as well as customize the Nexus User Agent.

Security Settings: Nexus’ pluggable security providers are configured in this section. You can control which security realms are active and the order in which they are consulted during authentication and authorization.

Anonymous Access:Control how and if Nexus is made available to anonymous, unauthenticated users.

Application Server Settings:If Nexus is hosted behind a proxy, or if you need to customize the URL, you can do so here.

System Notifications Settings:Configure automatic email notifications for important system events.

Configuring Scheduled Tasks

If you are publishing snapshots releases to Nexus, you will want to configure at least one scheduled task to periodically delete older snapshots releases. To configure a Scheduled Task, click on Administration -> Scheduled Tasks, and click on the Add button. Select the appropriate Task Type. Some of the more common and useful Task Types follow:

Backup All Nexus Configuration Files:Will cause Nexus to create a snapshot of all Nexus configuration files.

Download Indexes:Nexus will retrieve or update indexes for all remote, proxy repositories.

Evict Unused Proxy Items:If space is a premium, you can configure Nexus to remove proxy items which have not been used within a specific time period.

Remove Snapshots from Repository:Nexus can be configured to keep a minimum number of repositories and to delete snapshots older than a specific time period.

Scheduled tasks can be configured to send an email alert when they are executed, and you can schedule a task to run Once, Hourly, Daily, Weekly, Monthly, or using a custom cron expression.

Defining Repository Routes

Repository routes allow you to direct requests matching specific patterns to specific repositories. For example, if you wanted to make sure all requests for artifacts under org.someoss where directed to internal, hosted Releases and Snapshots repositories, you would define the following route:

5
1
​
2
Type: Inclusive
3
URL Pattern: .*/org/some-oss/.*
4
Repositories: Releases, Snapshots
5
​

To define a Repository Route, go to Administration -> Routing. The Routing panel is where you can edit existing routes and create additional routes.

Configuring Nexus Security

Nexus Security has a highly configurable Role-based Access Control system which relies on Privileges, Roles, and Users. By default, Nexus ships with a default admin, deployment, anonymous user along with associated roles. To configure a new Nexus user, go to Security -> Users and open up the Users panel. On the users panel, click on the Add button to add a new Nexus user. Once the user is created, click on the user to edit the user’s email address or to assign the user new Nexus roles.

To create or edit roles, click on Security -> Roles. Most of the default roles cannot be edited directly, but you are free to create new, custom roles by clicking on the Add button. Once a role is created, you can assign it new privileges, by dragging Roles and Privileges from the Available Roles/Privileges list to the Selected Roles/Privileges list and clicking on the Save button.

Section 11

Nexus Professional

Nexus Professional is a central point of access to external repositories which provides the necessary controls to make sure that only approved artifacts enter into your software development environment. Central features of Nexus Professional are:

Nexus Procurement Suite:Gives Nexus administrators control of what artifacts are allowed into an organization from a remote repository.

Nexus Staging Suite:Provides workflow support for software releases. Artifacts can be deployed to staging repositories, tested, and promoted only after they have been tested and certified.

Hosting Project Web Sites:With Nexus Professional, you can publish Maven project sites directly to your repository manager.

Support for OSGi Repositories:Nexus Professional supports OBR and P2 repositories used in OSGi and Eclipse development.

Enterprise LDAP Support:Nexus Professional adds support for LDAP clustering, and supporting mixed authentication configurations for multiple sources of security information including Atlassian’s Crowd server.

In addition to these features, Nexus Pro also adds support for Artifact Bundles, Centralized Management of Maven Settings, Custom Repository Metadata, Self-serve User Account Sign-up, and Artifact Validation and Verification.

Section 12

Other Nexus Resources

For more information about Sonatype’s Nexus, see the following resources:

Free Nexus Book:
http://books.sonatype.com/nexus-book

Nexus OSS Site:
http://nexus.sonatype.org

Nexus Pro Site:
http://www.sonatype.com/products/nexus

Participate in the Nexus Community

Everyone is welcome to participate in the Nexus community as a developer or user. To participate, take advantage of the following resources:

Nexus IRC Channel:
#nexus on irc.codehaus.org:6667

Subscribe to the Nexus User Mailing List:
nexus-user-subscribe@sonatype.org

Subscribe to the Nexus Developer Mailing List:
nexus-dev-subscribe@sonatype.org

Subscribe to the Nexus Pro User Mailing List:
nexus-pro-users-subscribe@sonatype.org

Checkout Nexus Source Code from Subversion:
http://svn.sonatype.org/nexus/trunk

Browse the Nexus JIRA Project:
https://issues.sonatype.org/browse/NEXUS

Like This Refcard? Read More From DZone

related article thumbnail

DZone Article

Creating Maven Artifacts From a jar File
related article thumbnail

DZone Article

Using Jenkins Local Maven Repository as An Internal Private Maven Repository
related article thumbnail

DZone Article

Ant-to-Maven Conversions: The Painless Method
related article thumbnail

DZone Article

Kill Your Dependencies: Java/Maven Edition
related refcard thumbnail

Free DZone Refcard

Platform Engineering Essentials
related refcard thumbnail

Free DZone Refcard

The Essentials of GitOps
related refcard thumbnail

Free DZone Refcard

Continuous Integration Patterns and Anti-Patterns
related refcard thumbnail

Free DZone Refcard

Getting Started With CI/CD Pipeline Security

ABOUT US

  • About DZone
  • Support and feedback
  • Community research
  • Sitemap

ADVERTISE

  • Advertise with DZone

CONTRIBUTE ON DZONE

  • Article Submission Guidelines
  • Become a Contributor
  • Core Program
  • Visit the Writers' Zone

LEGAL

  • Terms of Service
  • Privacy Policy

CONTACT US

  • 3343 Perimeter Hill Drive
  • Suite 100
  • Nashville, TN 37211
  • support@dzone.com

Let's be friends: