DZone
Thanks for visiting DZone today,
Edit Profile
  • Manage Email Subscriptions
  • How to Post to DZone
  • Article Submission Guidelines
Sign Out View Profile
  • Post an Article
  • Manage My Drafts
Over 2 million developers have joined DZone.
Log In / Join
Please enter at least three characters to search
Refcards Trend Reports
Events Video Library
Refcards
Trend Reports

Events

View Events Video Library

Zones

Culture and Methodologies Agile Career Development Methodologies Team Management
Data Engineering AI/ML Big Data Data Databases IoT
Software Design and Architecture Cloud Architecture Containers Integration Microservices Performance Security
Coding Frameworks Java JavaScript Languages Tools
Testing, Deployment, and Maintenance Deployment DevOps and CI/CD Maintenance Monitoring and Observability Testing, Tools, and Frameworks
Culture and Methodologies
Agile Career Development Methodologies Team Management
Data Engineering
AI/ML Big Data Data Databases IoT
Software Design and Architecture
Cloud Architecture Containers Integration Microservices Performance Security
Coding
Frameworks Java JavaScript Languages Tools
Testing, Deployment, and Maintenance
Deployment DevOps and CI/CD Maintenance Monitoring and Observability Testing, Tools, and Frameworks

The software you build is only as secure as the code that powers it. Learn how malicious code creeps into your software supply chain.

Apache Cassandra combines the benefits of major NoSQL databases to support data management needs not covered by traditional RDBMS vendors.

Generative AI has transformed nearly every industry. How can you leverage GenAI to improve your productivity and efficiency?

Modernize your data layer. Learn how to design cloud-native database architectures to meet the evolving demands of AI and GenAI workloads.

  1. DZone
  2. Refcards
  3. Getting Started with Drupal 7
refcard cover
Refcard #059

Getting Started with Drupal 7

Managing Content, Modules, and Themes

Introduces Drupal 7, including a discussion of Drupal pages, from types to content nodes, and instructions for installation.

Download Refcard
Free PDF for Easy Reference
refcard cover

Written By

author avatar Cindy McCourt
Consultant, IDCM Innovations
Table of Contents
► What is Drupal? ► A Drupal Page ► Webpage Header ► Drupal Menus ► Page Regions ► Types of Drupal Pages ► Types of Content Nodes ► Getting Started ► Add Fields to Content Types ► Add a Vocabulary to a Content Type ► Configure URL Aliases ► Manage Display of Fields ► Create a Menu ► Add a Page to a Menu ► Manage Text Formats ► Add an HTML Editor ► Adding Images ► Create an Image Style ► Modules ► Themes ► Configure Blocks ► Managing Roles and Permissions ► Configure User Account Settings ► Add a User
Section 1

What is Drupal?

By Cindy McCourt

Though Drupal could be described as an open-source content management system, in reality it is much more: a framework upon which web developers can build many types of online experiences, including database-driven websites, document repositories, interactive applications, and more.

Section 2

A Drupal Page

The word page is often used inconsistently in the Drupal community, but for this guide, I'll use webpage to refer to that which is displayed via a URL path such as /about or /contact-us. By understanding how a webpage is created in Drupal by default, you will better understand the tutorials to follow.

“Drupal

Drupal pages are created by the theme (barring the use of page layout modules) and consist primarily of the following:

  • A header displaying the logo, site name, site slogan, and more.
  • A main menu that includes links to the section landing pages.
  • Multiple regions where you can place blocks of content and other functionality.
  • A region displaying pages that define the webpage URL.
Section 3

Webpage Header

Starting at the top, the content in the header area is managed in multiple locations. Site name and slogan are entered in the Site information, the logo is uploaded in the theme settings, and if you want other features to show in this area, your theme can be customized to accommodate.

Section 4

Drupal Menus

Drupal 7 comes with four menus:

  • The Main Menu is typically used to display links to the main sections of your site.
  • The Navigation Menu provides links to create content and might include other links generated by modules.
  • The Management Menu is the black admin bar you will see across the top of your screen.
  • The User Menu includes the My Account and Logout links.

You can create your own menu as well. All menus are available as blocks and can be displayed in page regions.

Section 5

Page Regions

The quantity, placement, behavior, and style of webpage regions are defined by your theme. The diagrams on this page show sample theme regions. There are countless region configurations if you create your own theme.

Regions can hold one or more blocks. If a block is not present, the region will collapse and become undetectable to the user.

“Page

Section 6

Types of Drupal Pages

For this guide, the word page refers to that which appears in the content region (see diagrams). Pages generate URL paths that, in turn, deliver the webpage. The most common page is the node. The node is your article, your blog post, your event page, and so on. Other types of pages include (but are not limited to) the following.

Default teaser pages. By default, Drupal's homepage displays a teaser list of nodes. It also has a term teaser page, which displays all nodes tagged with a specific taxonomy term.

Views pages. These pages help you query the database and display bits of information about your nodes or other data. Views pages don't come by default with Drupal, but they're usually added when developing a site.

Panel pages. By including bundles of page layout modules, Panel pages provide a means of creating custom pages and node page layouts.

Webform pages. Webforms are online forms used to collect data from users and export that data for use elsewhere. Examples include a survey, contact form, sign up form, and so on.

Module pages. Module pages vary based on the module. If a module displays content or a form, it will likely come with a URL path for you to use. For example, the search module produces a search results page.

Administrative pages. In order to configure Drupal, you need to use Drupal's administrative pages. If you develop a module, you might create an admin page to configure the module.

Section 7

Types of Content Nodes

Nodes are created using content types. Content types are Drupal forms used to collect, relate, and display data in the content region of the webpage. Content types have at least five things in common: a title, body (most of the time), author, post date, and URL path. But you can add more. Two content types come enabled by default: Basic Page and Article. Four content types come preconfigured in module and are available to be enabled: Blog Entry, Forum Topic, Book Page, and Poll. You can also create your own content type.

Content Type Description Unique Feature
Basic Page Used when the type of content does not repeat such as About Us and Directions. NA
Article Used when type of content will be added on a regular basis. Includes an image and a tags field. Promoted to the default teaser homepage.
Blog Entry Alternative to Article. Comes with multiple teaser pages and links to user's blog.
Book Used relating nodes similar to a table of contents. Unique book navigation on the node and a book navigation block. Outline feature that creates the relationship works on all content types.
Forum Topic Used to post a discussion topic in a forum. Comes with multiple forum list pages. Engages Drupal Taxonomy system to organize topics into forums.
Poll Ask your visitors a single, multiple-choice question. Choose the number of options for the question and length of availability. Comes with a list page and with most recent poll question displayed.
Section 8

Getting Started

Install Drupal

After you've planned your site, the next step is to install Drupal on a web server. For detailed documentation on Drupal installation, please visit http://drupal.org/documentation/install. These instructions focus on installing Drupal on an actual web server. If you aren't ready to commit to a hosted solution, you can learn Drupal via a Drupal site installed on your personal computer.

One way to set a site on your computer is to use Acquia's dev desktop. This package will convert your computer to a local web environment and set up your Drupal site in a matter of minutes. Go to https://www.acquia.com/ downloads and download and install the Dev Desktop just as you would any other software package.

Configure Site Information

1. Click on Configuration in the black admin menu at the top of your screen.

2. Click on Site Information and configure any of the following:

  • Your site name
  • Site slogan (make sure your theme supports slogans)
  • Default email address for the site
  • Number of nodes to display in the homepage teaser
  • Set alternate pages for errors

Create Content

To create either a Basic Page or an Article in Drupal 7:

1. Click Add content in the grey shortcut menu at the top of your screen.

2. Click the type of content you want to create.

3. Complete the form.

4. Save.

Find Content

1. Click on Find Content in the grey shortcut menu.

2. Use the filters to find a specific type of content.

3. Update one or more nodes with the update options.

4. Use the operations to edit or delete a node.

Create a Content Type

In order to create your own content in Drupal 7:

1. Click on Structure in the black admin menu.

2. Click on Content Types.

3. Click on Add Content Type.

4. Complete the form. Note: review each option carefully. There are too many to convey here.

5. Save your content type or save and add fields.

Hot Tip

The configuration options apply to the nodes that the content type will create. When creating the node, you can override many of these settings node-by-node if you have the Administer Content permission.

Section 9

Add Fields to Content Types

You can add fields to all contents types, even those content types created using a module. The steps to add a field will vary, depending on the field you're adding.

Add New Field

You have two options: 1. Use a field whose type comes with Drupal, or 2. Use a field module downloaded from Drupal.org (see the Modules section of this card).

1. Assuming you aren't already in the Manage Fields interface, click on Structure and then Content Types.

2. Click Manage Fields for the content type to which the field will be added.

3. Locate the Add New Field option.

“Field

User-defined functions can be created by providing a name, zero or more arguments, and a return value (optional). For example:

4. Enter a label for your field, type of data, and form element.

“Field

Anonymous Functions

Before you save, you have the option to edit the field name.

5. Save.

6. Read the screen that follows and respond accordingly and click Save Field Settings to be sent to the field configuration interface.

7. Read the configuration options, respond accordingly and click Save Settings.

Reuse an Existing Field

Drupal comes with an image and term reference field (Tags) for the Article content type. If you want to add an image field to an existing content type or your custom content type, you can reuse the existing image field.

“Field

Should you reuse a field? Here some factors to consider.

  • Will you want to change the field settings from one content type to another? Click edit next to a field and observe features in the Settings box and features in the Field setting box. You can change Settings from one content type to another and not affect how that field is used. If you change the Field setting options (for example, Number of values) that change will affect all content types that use that field.
  • Will you want to manage access to the field differently between content types? For example, will anonymous users be able to see an image on Article but not on a Book page? Field visibility and permissions are part of the Field settings, are unique to the field, and are provided via the Field Permissions module.
Section 10

Add a Vocabulary to a Content Type

What is Drupal's Taxonomy?

From a content perspective, Drupal's taxonomy system provides a way to assign descriptive tags to nodes, making it easier for your site's visitors to locate related content.

From a technical perspective, each Drupal site has one taxonomy made up of multiple vocabularies. Each vocabulary contains multiple terms (or tags). Terms can have parent-child relationships with other terms. One term cannot be assigned to two vocabularies.

Create a Vocabulary

1. Click on Structures and then on Taxonomy.

2. Click on Add Vocabulary.

3. Complete the form and save.

4. Add terms to the vocabulary. Note: You can add fields via Manage Fields on the add/edit vocabulary screen.

Add Vocabulary Field

In Drupal 7, a vocabulary is now a field, and field type is a term reference. Use the steps covered in the "Add Fields to Content Types" section to add a vocabulary.

Form element options work for both single- and multi-select options for three types of form elements.

“Widget

Autocomplete term widget (tagging) is a free tagging option. This means you can add terms to your vocabulary as you create your content versus being required to use a pre-defined list of terms.

Alternative to Term Reference Field

Traditional select lists (via the List (text) field ) are still an option with Drupal, but the term reference field can be a viable alternative. List (text) field has the select list and check box/radio button options.

Which strategy is best for you? Consider the following scenario. You have a data table with multiple columns and you have enabled sorting on the columns. You click on the column header to sort the field that holds the vocabulary term. The table rows get reordered based on the alphanumeric values of the term in that field.

But … what if an alphabetical sort isn't what you need? What if you need to control the order in which table rows are displayed? The List (text) field will sort of the value you store in the database. If you allow a person to select 'Three months prior' from the select list, but assign the value 1 to the database (1|Three months prior), then rows with this value will appear first. A selection of 'Two months prior' set to 2 (2|Two months prior) would appear next. And so on.

Hot Tip

Once you have used the List (text) field, you cannot edit the a value that has been stored in the database. If the value and label are the same, consider the term reference field.

Section 11

Configure URL Aliases

When a node is created in Drupal, the path is /?=node/23 where 23 is the NID (node ID). When clean URLs are enabled on the site and available on your server, the default path for a node is /node/23. Neither option means much to the user or to search engines. Also, they are not very friendly when it comes to defining rules for when a block will appear on a webpage. Hence, we have URL aliases, turning /node/23 into something like /myfavorite- hobby.

Drupal comes with the Path module. This module allows you to manually add a URL alias each time you create a node.

The Pathauto module provides a way for you to create aliases via content path patterns. For instance, all article paths might look like this: article/titleof- node where the title is provided with the [node:title] token. The screen shot below provides some examples.

“Content

Section 12

Manage Display of Fields

When you are creating a node, you fill in the fields that are part of the content type form. The order in which those fields appear in the add/edit form is controlled by the same place you add fields, Manage fields.

The order in which the fields appear when the node is viewed by the public is controlled using the content type's Manage Display feature.

“Manage

You can perform the following tasks.

- Reorder the order of the fields. Click+hold+drag the + sign next to the field to reposition the field.

- Manage the label display: Above, Inline, or .

  • Choose a format for the data to be displayed. Not all fields have format options.
  • Refine formatting. Some fields allow you to take formatting a little further. For example, you can choose the image style you want for your Image field. (see "Image Styles" later in this card).
Section 13

Create a Menu

Sometimes you need a list of menu links to appear in a section of your site. For example, a menu called About might include a link to Partners, History, Methodology, and so on. The About menu would be a block that you can place in a region and set to show only on the pages in the About site section.

1. Click on Structure and then on Menus.

2. Click on Add Menu.

3. Provide a menu title (a name for your menu).

4. Save.

5. Add menu items (links to pages) to your new menu.

Section 14

Add a Page to a Menu

Add an Item via Menu Admin

1. Click on Structure and then on Menus.

2. Click Add Link next to the menu of choice.

3. Complete the form. Note: the URL path needs to exist first in order to add it to the menu.

4. Save.

Add an Item via a Module

When you create a node, you can add that node to a menu via the menu tab. You can also add nodes to menus via the menu admin interface.

The Views module creates page displays and a way for you to assign that page to a menu without having to go to the Menu admin pages. The Panels module provides the same type of option.

Some modules will add a page to a menu for you. The Forum module adds the Forums link to the Navigation menu when you enable that module. You can move the link to another menu if you wish by editing the menu item.

Section 15

Manage Text Formats

Drupal 7 comes with three text formats: Plain text, Filtered HTML, and Full HTML. All roles on the site have access to plain text. You can select which roles utilize the HTML format options.

“Manage

When text and HTML markup is added to a field configured to allow HTML, Drupal collects that content and stores it. When the node is viewed, Drupal looks at the text format settings for the node and send only that which the text format allows. For example, the Filtered HTML format does not have the table tags as approved HTML tags. If a user creates a node and includes a table, it will not show. You have two options:

1. Add the table tags to the list of allowed HTML tags by configuring the Filtered HTML format.

2. Give your users permission to choose Full HTML. Be careful with this as it gives your user a lot of power.

To manage text formats, go to Configuration > Text formats.

Section 16

Add an HTML Editor

By default, Drupal does not come with an HTML editor installed. You can add an HTML editor one of two ways:

1. Use the WYSIWYG module and add an editor library such as CKEditor, TinyMCE, or others. You can add as many as you like. Assign the editor to a text format.

2. Use a module dedicated to one particular editor such as the CKEditor module.

Buttons should match the tags permitted by the text format to which it is assigned.

Section 17

Adding Images

There are many ways to put an image on a page in Drupal. Below are four options to get you started.

Adding images

Image Field

The advantage of this approach is the ability to reuse the images you upload. For example, you can create a page listing your nodes and include a thumbnail of the image associated with the node. The original image would be used but styled to fit using an image style.

Image field. Upload an image via a field and display the image from the field.

Image field and Insert. Upload an image via a field, hide the image from showing from the field, use the Insert module and insert the image into the body of the node.

HTML Editor Image Editor

The advantage of this approach is usability. If you are not going to reuse the image, sometimes it's easier for users to click the image icon on an editor bar.

HTML Editor. Install an HTML editor and use the Image editor button to add a link to an image that will be embedded in the body. Images can be uploaded manually to the server or link to an image via a URL.

HTML Editor and IMCE. Install an HTML Editor and the IMCE module. IMCE adds a browse option allowing you to upload an image to the server via the Image editor button.

Section 18

Create an Image Style

When a user uploads an image with the Image field, you can't always predict the size of the image. With an image style, you can manage the display of the image field such that all images have a specific width and/ or height.

1. Click on Configuration and then on Image Styles.

2. Click on Add Style.

3. Give the style a name. Hint: Names like icon, thumbnail or small don't convey much about the style. A name like scale_100w says this style will scale the image (versus resize) and it will keep the image from distorting because the height is allowed to be whatever it needs to be after the width is set to 100 pixels.

4. Add one or more effects to the style to match the style name.

5. Update the style.

This style is now available for use in Manage Display and other modules that use image styles such as Insert, Views, and Panels.

Section 19

Modules

Find and Choose Modules

Modules are bundles of code that add new or modify existing functionality in Drupal. Contributed modules can be found at http://drupal.org/project/ modules. A couple things to know about modules:

Dependencies. Modules can be dependent on other modules. Therefore you might need to install multiple modules to get the functionality you want.

Status. Module project pages have status information to help you decide if the module is supported. There are too many indicators to discuss here.

Install a Module

The process of installing a module will depend on your server environment. Each module contains a readme.txt and/or install.txt file with instructions on how to install that particular module. The general steps are:

1. Download the module tar.gz or zip file.

2. Upload the file to /sites/all/modules. You might need to create the 'all' and 'modules' directory.

3. Unpack or unzip the file. Note: If you are using FTP, you might need to reverse steps 2 and 3.

Enable a Module

You can enable a core, contributed, and/or custom module such as Blog, Forum, or Poll with the following steps:

1. Click on Modules in the black admin menu bar.

2. Check the box for the module(s) you want.

3. Save the configuration.

Hot Tip

Drupal will remind you if you didn't enable a dependent module. When it does, click Continue and Drupal will do the rest.

Configure a Module

Modules vary significantly, so it's impossible to convey one process for module configuration. To learn more about a particular module's configuration, consider the following:

  • Review the readme.txt file that comes with the module.
  • Check the module's project page on Drupal.org.
  • Search for online tutorials for the module.
  • Ask for support in the module's issue queue.
Section 20

Themes

Find a Theme

You learned at the start of the reference card that the theme controls your page layout. Go to http://drupal.org/project/themes to locate a theme you want to use (assuming you aren't building your own theme).

Dependencies. There are standalone themes, base themes, and subthemes. Subthemes depend on base themes.

Status. Theme project pages have status information to help you decide if the theme is supported. There are too many indicators to discuss here.

Install a Theme

The process of installing a theme will depend on your server environment. Each theme contains a readme.txt and/or install.txt file with instructions on how to install that particular theme. The general steps are below.

1. Download the theme tar.gz or zip file.

2. Upload the file to /sites/all/themes. You might need to create the 'all' and 'modules' directory.

3. Unpack or unzip the file. Note: If you are using FTP, you might need to reverse steps 2 and 3.

Enable a Theme

You can enable a core, contributed, or custom theme such as Garland, Stark, Danland, and so on with the following steps.

1. Click on Appearance in the black admin menu bar.

2. Locate the theme you want under Disable Themes.

3. Click on Enable and set default. You can choose to enable a theme and not set it as default, thus giving you the option to configure a change in your current site without anyone knowing until you are ready.

Configure a Theme

Themes vary but there are some consistencies regarding configuration. Each theme will have the following.

  • Toggle display options. These options allow you to enable and disable features such as the logo, menus, user pictures, search, and more.
  • Logo image settings. Note: the image will need to be the right size before you upload.
  • Shortcut icon settings. This is also known as the favicon.
  • Some themes will have extensive configuration options available to you. Omega, Fusion, AdaptiveTheme, to name a few, are base themes that add significant configuration options in the admin interface.
Section 21

Configure Blocks

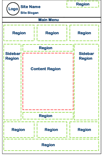
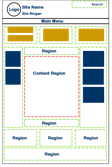
Once you have your theme enabled, you are ready to start configuring the blocks for your web pages. There are three decisions you need to make when configuring blocks.

1. In which region will the block appear?

2. Where in that region will the block appear?

3. When should the block appear?

Choose a Region

There are two ways to choose a region for your block.

1. Click on Structure and then on Blocks.

2. Locate the block you want to position.

3. Either use the Region dropdown or click Configure.

4. If you click Configure, you will be given the option to set the block for all enabled themes at once.

5. If you use the Region dropdown, remember to save your changes.

Choose a Location in the Region

If you have multiple blocks in one region, in what order should they appear? Place the blocks with the following steps.

1. Click on Structure and then on Blocks.

2. Locate the block you want to position.

3. Click+hold+drag the + next to the block to place the block.

4. Save.

Designate When the Block Should Appear

There are three conditions to choose from: 1. Pages, 2. Content type, and 3. Roles.

“Visibility

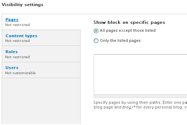
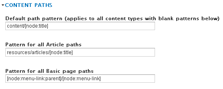
Pages. When using the Pages option, the condition is based on a URL path. If you declare that all Article nodes will have a path that begins with article, you can set a block for each article node by setting the Pages visibility condition to the following.

1. Only on the listed pages.

2. articles/* Note: This means that all pages whose URL path begins with mysitename.com/articles will show this block.

Content types. If you have a block that should appear on nodes of a specific type, regardless of their path, this is the condition you need.

Roles. If you want to control who sees the block, select the role. If you don't make any selection, all will be assumed.

You can use one or more of the conditions at a time. For instance, if Pages is … and Content type is … and Roles is …, then show block.

Section 22

Managing Roles and Permissions

Throughout this Refcard, I've discussed two roles: anonymous and authenticated. In Drupal 7, there is also a third: administrator.

  • Anonymous refers to those not logged into your site.
  • Authenticated refers to those logged into your site.
  • Administrator can do anything on your site by default.

The first user on a Drupal site user/1 cannot be stripped of administrative rights; this user is all-powerful. Use this role with care.

Create a Role

1. Click on People, then Permissions, then Roles.

2. Type the name of the role and click Add Role.

Set Permissions for Roles

1. Click on the Permissions tab.

2. Check the permission setting for each role.

3. Save permissions.

Section 23

Configure User Account Settings

You have several configuration options regarding user accounts.

1. Click on Configuration in the black admin menu and then click on Account settings.

2. Review and edit your options to meet your needs.

Included in the account settings admin page are the emails that the system sends out. You can customize these, but remember these apply to all communications versus those that might be associated with one particular event on your site.

Section 24

Add a User

1. Click on People.

2. Click on Add User.

3. Complete the form. Note: if you want to collect more information from the user, you can add fields with the Manage Fields tab.

4. Save.

Like This Refcard? Read More From DZone

related article thumbnail

DZone Article

Adding a CMS to Your Static Site With Netlify CMS
related article thumbnail

DZone Article

How to Merge HTML Documents in Java
related article thumbnail

DZone Article

Enforcing Architecture With ArchUnit in Java
related article thumbnail

DZone Article

Creating a Web Project: Caching for Performance Optimization
related refcard thumbnail

Free DZone Refcard

Getting Started With Low-Code Development
related refcard thumbnail

Free DZone Refcard

JavaScript Test Automation Frameworks
related refcard thumbnail

Free DZone Refcard

Salesforce Application Design
related refcard thumbnail

Free DZone Refcard

E-Commerce Development Essentials

ABOUT US

  • About DZone
  • Support and feedback
  • Community research
  • Sitemap

ADVERTISE

  • Advertise with DZone

CONTRIBUTE ON DZONE

  • Article Submission Guidelines
  • Become a Contributor
  • Core Program
  • Visit the Writers' Zone

LEGAL

  • Terms of Service
  • Privacy Policy

CONTACT US

  • 3343 Perimeter Hill Drive
  • Suite 100
  • Nashville, TN 37211
  • support@dzone.com

Let's be friends: