DZone
Thanks for visiting DZone today,
Edit Profile
  • Manage Email Subscriptions
  • How to Post to DZone
  • Article Submission Guidelines
Sign Out View Profile
  • Post an Article
  • Manage My Drafts
Over 2 million developers have joined DZone.
Log In / Join
Please enter at least three characters to search
Refcards Trend Reports
Events Video Library
Refcards
Trend Reports

Events

View Events Video Library

Zones

Culture and Methodologies Agile Career Development Methodologies Team Management
Data Engineering AI/ML Big Data Data Databases IoT
Software Design and Architecture Cloud Architecture Containers Integration Microservices Performance Security
Coding Frameworks Java JavaScript Languages Tools
Testing, Deployment, and Maintenance Deployment DevOps and CI/CD Maintenance Monitoring and Observability Testing, Tools, and Frameworks
Culture and Methodologies
Agile Career Development Methodologies Team Management
Data Engineering
AI/ML Big Data Data Databases IoT
Software Design and Architecture
Cloud Architecture Containers Integration Microservices Performance Security
Coding
Frameworks Java JavaScript Languages Tools
Testing, Deployment, and Maintenance
Deployment DevOps and CI/CD Maintenance Monitoring and Observability Testing, Tools, and Frameworks

Because the DevOps movement has redefined engineering responsibilities, SREs now have to become stewards of observability strategy.

Apache Cassandra combines the benefits of major NoSQL databases to support data management needs not covered by traditional RDBMS vendors.

The software you build is only as secure as the code that powers it. Learn how malicious code creeps into your software supply chain.

Generative AI has transformed nearly every industry. How can you leverage GenAI to improve your productivity and efficiency?

  1. DZone
  2. Refcards
  3. Getting Started With Caucho Resin
refcard cover
Refcard #088

Getting Started With Caucho Resin

The Java EE 6 Web Profile in an App Server

Learn the basics of the Resin app server and the features of Resin 4.0. Resin comes in two flavors: Resin Open Source and Resin Professional.

Download Refcard
Free PDF for Easy Reference
refcard cover

Written By

author avatar Emil Ong
Chief Evangelist, Caucho Technology
Table of Contents
► About Resin ► Downloading Resin ► Installing Resin ► Resin Directory Layout ► Starting Resin ► Configuring Resin ► Monitoring and Administration ► Deploying Applications ► Connecting Databases ► Logging ► The Resin HTTP Server ► Security ► Developing with Resin ► Clustering Resin
Section 1

About Resin

By Emil Ong

Caucho Technology's Resin® is a Java Application Server with a reputation for being lightweight and fast, yet reliable and scalable enough to power the most demanding enterprise sites. Beginning as a Servlet and JSP engine in 1998, Resin has since evolved to support the Java EE 6 Web Profile within highly integrated implementations of Servlet 3.0, CDI, and EJB 3.1 Lite. In addition to the Web Profile standards, Resin also includes a high performance JTA transaction manager, a JMS provider, clustering, connection pooling, and a management console.

Resin is available in two flavors: Resin Open Source and Resin Professional. Resin Open Source is licensed under the GPL and has all the features necessary for Java EE 6 Web Profile development. Resin Professional builds on Resin Open Source and offers advanced features such as clustering (both traditional and cloud), fast native I/O, proxy caching, and OpenSSL integration.

Section 2

Downloading Resin

Resin is maintained in two branches: stable and development. At the time of writing, the stable branch is Resin 3.1 and the development branch is Resin 4.0. Users should note that despite the name, each release of the development branch is production ready. It's termed “development” because all new features and APIs go into this branch, but core technologies like Web Profile APIs are stable. This Refcard will deal entirely with Resin 4.0 because it contains the Java EE 6 Web Profile implementation (Resin 3.1 focused on Java EE 5) and has many new exciting features that are useful for emerging technologies such as cloud deployment.

All currently available versions of Resin are listed for download at http://caucho.com/download. Most users will want to download Resin Professional, even if they haven't purchased a license. Without the license, Resin Professional operates just like Resin Open Source. If you decide to upgrade later, all you have to do is drop in a license file. Developers who want a purely GPL version can download Resin Open Source.

Section 3

Installing Resin

Resin is available in tar.gz and .zip formats for Unix, Mac OS X, and Windows users. While Resin can run in a pure Java mode, it also features some native (JNI) code that offers functionality like dropping root privileges in Unix and OpenSSL integration. Because of these features, you'll need to compile the JNI code if you're running on Unix or Mac OS X. Windows DLLs are provided in the distribution. Ubuntu Linux users can use Caucho's Ubuntu repository to install Resin as a .deb.

Hot Tip

Resin 4.0 now requires Java SE 6. This latest version of Java introduces a number of API improvements and Caucho's internal testing shows performance benefits as well. Make sure to get the JDK, not just the JRE.

Unix and Mac OS X Installation

To install Resin on Unix and Mac OS X, you'll need to compile the JNI code for Resin. Before you compile, you'll need an environment capable of compiling C code (gcc, etc.). You'll probably also want OpenSSL, though this isn't strictly required. Once you've unpacked Resin, it should create a directory with the full Resin version name (e.g. resin-pro-4.0.4). Change to this directory and run the following commands:

​x
1
​
2
$ ./configure
3
$ make
4
$ sudo make install
5
​

You'll need to run the last command (make install) as root so you can install Resin system wide. By default, this installs Resin in /usr/local/resin-<version>, but you can change this behavior by passing the --prefix= to the configure command. For more options, pass -- help to the configure command.

Windows Installation

Resin includes precompiled DLLs for the native code, so no compilation is necessary. Simply unpack the Resin .zip file directly where you'd like to install Resin and you're done. Typically, we recommend C:\Resin.

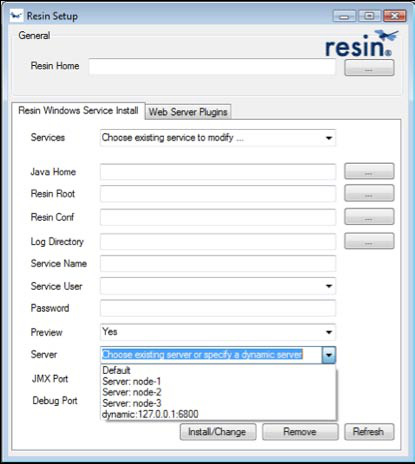
Once you have Resin installed, you should see two .exe files in the top-level Resin directory, resin.exe and setup.exe. resin. exe launches Resin from the command line, but is used for backwards compatibility. setup.exe installs Resin as a Windows Service, which we will discuss in a later section.

Ubuntu Installation

Ubuntu users can use Caucho's Ubuntu repository to install Resin. Add the following lines to your /etc/apt/sources.list:

4
1
​
2
deb http://caucho.com/download/debian/ unstable universe
3
deb http://caucho.com/download/debian/ unstable multiverse
4
​

After adding these lines, then run

3
1
​
2
$ sudo apt-get update
3
​

This command will update your Ubuntu database with information about the latest Resin releases. To install Resin, run:

3
1
​
2
$ sudo apt-get install resin-pro
3
​

This will install Resin Professional. Use “resin” instead of “resin-pro” if you'd prefer to install Resin Open Source. This installation will start Resin for you automatically on startup.

Section 4

Resin Directory Layout

Resin uses a number of directories for the server itself, application files, and logging. These are all configurable (as you saw in the installation section), but we'll need to refer to them by name later. The following table will give the names, descriptions, and standard locations of commonly used Resin directories:

Directory Description Recommended
Resin Home Contains Resin server jars, JNI, and licenses. /usr/local/resin-<version> (Unix)
C:\Resin (Windows)
Root Directory Contains application content, log files, and server data /var/www (Unix)
C:\www (Windows)
Web App Deploy Directory Contains applications (.war files and exploded applications) webapps/ (Subdirectory of root directory)
Log Directory Contains server and access log files log/ (Subdirectory of root directory)

Resin separates the Resin Home directory, where Resin's libraries and licenses are contained, from the root directory, where your applications and logs are maintained. This structure makes it easier for you to upgrade Resin without disturbing your applications. In other words, you can just replace your Resin Home directory with the new Resin installation to upgrade.

Section 5

Starting Resin

Resin Command Line

Resin can be started from the command line for debugging and development purposes. To run Resin with its output sent to the console, use the following command:

3
1
​
2
$ java -jar $RESIN_HOME/lib/resin.jar console
3
​

Resin can also open a standard Java debugging port on startup using the -debug-port option:

3
1
​
2
$ java -jar $RESIN_HOME/lib/resin.jar -debug-port 8000 console
3
​

Similarly, you can have Resin open a JMX port using the jmxport option:

3
1
​
2
$ java -jar $RESIN_HOME/lib/resin.jar -jmx-port 9000 console
3
​

To have Resin run in the background with its log output placed in the log directory, run:

3
1
​
2
$ java -jar $RESIN_HOME/lib/resin.jar start
3
​

You may also want to set the root directory of Resin and a specific configuration file on the command line as well:

3
1
​
2
$ java -jar $RESIN_HOME/lib/resin.jar --root-directory /var/www --conf /etc/resin/resin.xml start
3
​

If you need to stop Resin, you can run:

3
1
​
2
$ java -jar $RESIN_HOME/lib/resin.jar stop
3
​

This command stops the Resin instance, but the Resin Watchdog will still be running. The Resin Watchdog (see the Hot Tip below for more info) and all Resin processes can be stopped by running:

3
1
​
2
$ java -jar $RESIN_HOME/lib/resin.jar shutdown
3
​

Starting Resin at Boot

Once you have installed Resin system-wide, you may want to have it start when your server boots up. Resin provides start scripts for Unix and Windows.

Unix boot-time start up

Resin provides an init.d script and installs it in /etc/init.d/resin. This script is editable and essentially just starts the Resin server using the command line interface shown above. For standard installations, it shouldn't be necessary to modify this file, but you can configure alternate directories.

Windows Server Installation

Resin includes a Windows installation program called setup. exe to create a Windows Service. You can set parameters such as the Resin Home, Resin Root, and Log Directory for the service. You can also set the Service name or remove an existing service.

Resin Setup

Hot Tip

Even though we showed Resin run as a single Java process above, there are actually two processes being run, Resin and a Watchdog. The Watchdog is in charge of launching and monitoring the Resin process. This architecture provides additional reliability by restarting Resin if there's an error.

Section 6

Configuring Resin

Configuring the Resin Server

Resin's server configuration is XML-based and contained largely within one file called resin.xml. The default resin.xml should work fine for most users with single-server deployments or developers. For more advanced configurations however, you'll want to understand and modify the resin.xml file.

Structure of resin.xml

The XML structure of the resin.xml file models the organization of Resin. At the top level there is the full Resin deployment which contains clusters. Each cluster is a set of servers and (virtual) hosts. (Note that even when running a single server, Resin considers this to be a cluster with one server.) Each host contains web applications.

Resin XML Structure

With this hierarchical structure, you can share resources and policies across applications. For example, you could configure a database pool shared by all applications in a single host or a distributed cache shared by all servers in a cluster.

Configuring JVM parameters

One of the most common tasks that administrators first do when setting up a new server is to configure JVM parameters. Because of Resin's Watchdog architecture, you can configure these parameters directly in your resin.xml file. When the Watchdog launches (or relaunches) a server, it will start a new JVM with these parameters:

8
1
​
2
<resin>
3
<cluster>
4
<server id=“a”>
5
<jvm-arg>-Xmx512m </jvm-arg>
6
</server>
7
...
8
​

Configuring Applications with resin-web.xml

Resin supports a number of features for applications that go beyond what Java EE standards specify, such as database pooling, custom logs and log rotation, and security authenticators. All of these facilities can be configured in the top-level resin.xml or in a Resin-specific application deployment descriptor file named WEB-INF/resin-web.xml. This file is recognized by Resin and can be used alongside of the portable web.xml descriptor file to configure Resin-specific resources. You can think of the resin-web.xml file as providing the <web-app> configuration in the resin.xml structure above. The sections below will discuss how to configure resources in the resin-web.xml file.

Section 7

Monitoring and Administration

Setting Up an Administrator Password

Once you've started Resin, one of the first tasks you'll want to do is set up a password for administration tasks. To do this, just browse to http://localhost:8080/resin-admin (replace localhost with the host on which you've installed Resin if it's different). There you should see a login page with a section called Don't have a login yet? Enter a username and password, then submit and follow the directions on the next page for copying the generated password file to your Resin installation.

Once you've installed the password file, Resin will restart automatically and you can login with the password you've set up. The administration application features a number of monitoring resources for web applications, the proxy cache, server configuration, cluster status, memory usage, CPU usage, sampling-based profiling, and post-mortem failure analysis.

Resin Admin

Section 8

Deploying Applications

File System Deployment

Resin offers file system-based “hot deployment” with which you can deploy an application by copying it to the Resin “webapps” directory. The application can be either in .war form or an “exploded” war. If you deploy the application as a .war, Resin will expand and start it automatically by default.

Many developers may also prefer to copy their application in “exploded” form for development. Resin is able to detect changes to the code base (both JSPs and Java files) within the application and automatically recompile and redeploy. This feature can help developers iterate quickly to see code changes in their application.

While file system-based deployment is great for developing applications and deploying applications on a single machine, it can be difficult to manage when deploying to multiple machines in a cluster. Resin offers a distributed deployment mechanism for these cases.

Distributed Deployment

Resin 4.0 introduced a new clustering mechanism and a new deployment tool for distributed applications. This tool lets users deploy their application once and have it distributed across all servers in a cluster, even dynamic servers that are added after the application is deployed! (See the Clustering section for more information about dynamic servers.)

This tool is accessible via Ant and Maven. To use the Resin Maven plugin to deploy, add Caucho's Maven repository to your pom.xml:

14
1
​
2
<pluginRepositories>
3
<pluginRepository>
4
<snapshots>
5
<enabled>true</enabled>
6
<updatePolicy>always</updatePolicy>
7
<checksumPolicy>ignore</checksumPolicy>
8
</snapshots>
9
<id>caucho</id>
10
<name>Caucho</name>
11
<url>http://caucho.com/m2-snapshot</url>
12
</pluginRepository>
13
</pluginRepositories>
14
​

Once you have the plugin available, add it to your build configuration and specify the administrator username and password that you setup in the administration application:

18
1
​
2
<build>
3
<finalName>foo</finalName>
4
<plugins>
5
<plugin>
6
<groupId>com.caucho</groupId>
7
<artifactId>resin-maven-plugin</artifactId>
8
<version>4.0.4</version>
9
<configuration>
10
<server>127.0.0.1</server>
11
<port>80</port>
12
<user>admin</user>
13
<password>my-admin-pass</password>
14
</configuration>
15
</plugin>
16
</plugins>
17
</build>
18
​

Once you have this configuration in your pom.xml, you can deploy to Resin simply by using the upload .war goal:

3
1
​
2
$ mvn resin:upload-war
3
​

For more Maven options, see http://wiki.caucho.com/Maven2 For the related Ant plugin, see http://wiki.caucho.com/Ant

Section 9

Connecting Databases

Resin features a built-in database pool which allows multiple database servers, load balancing, and connection checking. Resin's database pools are integrated with Resin's CanDI (CDI implementation) so that developers can use annotations to inject the database easily into their code.

The following code shows a sample database pool configuration that you might include in your resin-web.xml for a pool of up to 150 simultaneous connections:

12
1
​
2
<web-app xmlns="http://caucho.com/ns/resin">
3
<database jndi-name="jdbc/myDb">
4
<driver type="org.postgresql.Driver">
5
<url>jdbc:postgresql://localhost/test</url>
6
<user>myUser</user>
7
<password>myPassword</password>
8
</driver>
9
<max-connections>150</max-connections>
10
</database>
11
</web-app>
12
​

Once you've configured the pool in your resin-web.xml, you can either use JNDI to access the DataSource or use CDI annotations as in the following class:

7
1
​
2
public class MyBusinessLogic {
3
@javax.inject.Inject
4
DataSource myDatabase;
5
...
6
}
7
​
Section 10

Logging

Resin uses standard java.util.logging facilities for all its internal logging and implements several custom log handlers to manage log output and log rotation. The default logging configuration in the resin.xml file provides INFO-level logging for all Resin output. The XML for this configuration is:

4
1
​
2
<log-handler name=“” level=“all” path=“stdout:” timestamp=“[%y-%m-%d %H:%M:%S.%s] {%{thread}}” />
3
<logger name=“com.caucho” level=“info”/>
4
​

You can configure additional loggers for your classes simply by adding another <logger> tag either to resin.xml or your application's resin-web.xml. The default log-handler will output all log messages to the log directory (or standard output, if running in console mode). You can also configure additional log-handlers to deal specifically with your classes' log messages. For example, if all of your packages started with “com.example”, you could configure a logger and log-handler:

4
1
​
2
<log-handler name=“com.example” level=“all” path=“example.log” archive-format=“example-%Y%m%d.log.gz” rollover-period=“1D”/>
3
<logger name=“com.example” level=“info”/>
4
​

Notice that the names of both the logger and log-handler are “com.example”. We also changed the path to an explicit file name. We also added a rollover-period and an archive format. In this case, the log will be rolled over (rotated) once a day and the old log will be stored as example-%Y%m%d.log.gz, where the %Y%m%d will be replaced with the year, month, and date when the log was rolled over. The .gz extension also indicates to Resin that this log should be gzipped.

Section 11

The Resin HTTP Server

Resin includes its own powerful HTTP server which features comparable performance to C-based servers such as Apache or nginx without the overhead of requiring multiple processes. Using the Resin HTTP server is recommended. In addition to its solid performance, the Resin HTTP server also has a number of convenient features for configuring SSL, rewriting requests, and managing virtual hosts.

OpenSSL

One of Resin Professional's most useful features is OpenSSL integration which offers far faster SSL performance than pure Java solutions. To configure OpenSSL, add an <http> tag with an <openssl> tag to your server configuration:

16
1
​
2
<resin xmlns=“http://caucho.com/ns/resin” xmlns:resin=“urn:java:com.caucho.resin”>
3
<cluster id=“app-tier”>
4
<server id=“” address=“192.168.0.10” port=“6800”>
5
<http port=“443”>
6
<openssl>
7
<certificate-file>example.crt</certificate-file>
8
<certificate-key-file>example.key</certificate-key-file>
9
<password>my-password</password>
10
</openssl>
11
</http>
12
</server>
13
</cluster>
14
...
15
</resin>
16
​

Rewrite Dispatch

Resin offers a URL rewriting mechanism similar to Apache's mod_rewrite in its HTTP server. Rules for rewriting URLs can be configured on an application, host, server, or cluster level. For example, you may want to allow all requests for specific static resources (such as images, CSS, JavaScript, etc.) to be served as usual, but redirect all other requests to a central controller Servlet. You could achieve that within your resin-web.xml with the following configuration:

6
1
​
2
<web-app xmlns=“http://caucho.com/ns/resin” xmlns:resin=“urn:java:com.caucho.resin”>
3
<resin:Dispatch regexp=“\.(php|js|gif|png|css|html)$”/>
4
<resin:Dispatch regexp=“^” target=“/controller”/>
5
</web-app>
6
​

The <resin:Dispatch> tag here is an internal redirection (i.e. the request is passed within the server without an HTTP redirect). You can use tags for HTTP forwarding, FastCGI integration, load balancing, and more:

Tag Behavior
<resin:Dispatch> Redirect a request internally
<resin:Redirect> Send an HTTP redirect
<resin:Forbidden> Send an HTTP forbidden response
<resin:Forward> Send an HTTP forward
<resin:FastCgiProxy> Redirect requests to a backend FastCGI process
<resin:HttpProxy> Redirect requests to a backend HTTP service
<resin:LoadBalance> Redirect the request to a backend cluster for processing

Virtual Hosts

For many deployments, you may not need to use specialized virtual hosts (e.g. you only use example.com and www.example. com). In these cases, you can deploy to the standard web app deploy directory and Resin will serve all your applications regardless of the virtual host specified by the client.

If you have a deployment with more virtual hosts however (store.example.com, blog.example.com, etc.), you'll need to organize your applications in the appropriate virtual hosts. Virtual hosts are a native concept to Resin and you can create them two different ways:

  • Use Resin's host deploy directory
  • Create an explicit host with the <host> tag in resin.xml

The host deploy directory allows you to create a directory structure such as:

3
1
​
2
/var/www/hosts/store.example.com/webapps
3
​

Then any applications deployed in this webapps directory will be served from Resin as store.example.com.

You may prefer to use an explicit <host> tag in your resin.xml. This approach allows you to create a custom directory structure and make your hosts explicit in configuration.

Section 12

Security

Resin provides two aspects of security for web applications: authorization and authentication.

Authentication

Resin provides an authentication framework that allows applications to authenticate users from a wide variety of sources including LDAP, a JDBC database, JAAS, or a simple XML database.

Authenticator Description
XmlAuthenticator For basic applications with few users (such as the Resin administration console).
LdapAuthenticator Can reference an LDAP database for users and passwords. Specify a distinguished name prefix and/or suffix to select users.
JdbcAuthenticator Specify a table and columns against which users, passwords, and roles will be authenticated.
JaasAuthenticator Use any JAAS plugin to authenticate users.

For example, to configure the XmlAuthenticator, you might add this XML to your resin.xml or resin-web.xml:

11
1
​
2
<web-app xmlns=“http://caucho.com/ns/resin” xmlns:resin=“urn:java:com.caucho.resin”>
3
<resin:XmlAuthenticator>
4
<password-digest>md5-base64</password-digest>
5
<user name='myuser' password='IXiMnz7P2cJU18MSJjKiaA=='>
6
<role>user</role>
7
<role>foo</role>
8
</user>
9
</resin:XmlAuthenticator>
10
</web-app>
11
​

Authorization

While Resin supports the Servlet standard <securityconstraint> mechanism, it also provides an easy-to-use, yet powerful alternative that is integrated with the Rewrite Dispatch architecture. This integration makes it possible to handle requests for authorized and unauthorized users with custom logic. As an example, you may want to allow all accesses to an “/admin” application only if the user is in the proper “admin” role:

13
1
​
2
<web-app xmlns=“http://caucho.com/ns/resin” xmlns:resin=“urn:java:com.caucho.resin”>
3
<resin:Forbidden regexp=“^/admin”>
4
<resin:Not>
5
<resin:IfUserInRole role=“admin”/>
6
</resin:Not>
7
</resin:Forbidden>
8
<resin:Dispatch regexp=“^/admin”>
9
<resin:IfUserInRole role=“admin”/>
10
<resin:AddHeader name=“Cache-Control” value=“no-cache”/>
11
</resin:Dispatch>
12
</web-app>
13
​

Notice that we also changed the caching behavior of the response to indicate that browsers should not cache this secure content.

Section 13

Developing with Resin

Eclipse Integration

Resin features a development plugin for Eclipse based on the WTP framework. With this plugin, developers have all of the facilities of the WTP environment with the ability to deploy to Resin using a variety of file system and remote deployment options.

New server runtime dialog

The plugin includes built-in configuration files for the development environment, but you can use any configuration file as well.

To download and install the Eclipse plugin for Resin, add http://caucho.com/eclipse as an update site within Eclipse and install the Caucho Resin plugin.

Testing Resin

Resin features an embedded server interface which can be used in test frameworks such as JUnit. The following example code shows how this API can be used to test a service injected using Resin CDI implementation, CanDI:

20
1
​
2
package qa;
3
import org.junit.*;
4
import org.junit.runner.RunWith;
5
import static org.junit.Assert.*;
6
import com.caucho.junit.ResinBeanContainerRunner;
7
@RunWith(ResinBeanContainerRunner.class)
8
@TestConfiguration(beanXML="beans-test.xml")
9
public class AccountServiveTest {
10
@Inject
11
private AccountService accountService;
12
@Test
13
public void testGetAccount()
14
throws Exception
15
{
16
Account account = accountService.getAccount(1007);
17
assertNotNull(account);
18
}
19
}
20
​
Section 14

Clustering Resin

Resin provides clustering capabilities for both traditional clusters and cloud deployments. This functionality includes:

  • Smart load balancing
  • Distributed session replication
  • Distributed object caching
  • Dynamic server addition and removal
  • Distributed application deployment

To get started with Resin clustering, you can add <server> configurations to a <cluster>:

8
1
​
2
<resin xmlns=“http://caucho.com/ns/resin” xmlns:resin=“urn:java:com.caucho.resin”>
3
<cluster id=“app-tier”>
4
<server id=“app-a” address=“192.168.0.10” port=“6800”/>
5
<server id=“app-b” address=“192.168.0.11” port=“6800”/>
6
...
7
</cluster>
8
​

The default resin.xml file has distributed sessions already enabled, so by adding these servers you've already got a cluster that can share data.

The start up procedure for Resin changes a bit when you have a cluster. When you have multiple servers configured in your resin.xml, you need to specify which of the servers you will use:

3
1
​
2
$ java -jar $RESIN_HOME/lib/resin.jar -server app-a start
3
​

In this case, you would run this command from the machine with the network interface assigned the IP 192.168.0.10, as per the configuration above.

Load Balancing

Once you've got a backend cluster set up as we did above, you'll probably want to add load balancing. In the same resin.xml as the app-tier cluster, add the following cluster configuration for a web-tier:

17
1
​
2
<resin xmlns=“http://caucho.com/ns/resin” xmlns:resin=“urn:java:com.caucho.resin”>
3
<cluster id=“app-tier”>
4
...
5
</cluster>
6
<cluster id=“web-tier” root-directory=“web-tier”>
7
<server id=“web-a” address=“123.45.67.89” port=“6800”>
8
<http address=“*” port=“80”/>
9
</server>
10
<host id=“”>
11
<web-app id=“/”>
12
<resin:LoadBalance regexp=“” cluster=“app-tier”/>
13
</web-app>
14
</host>
15
</cluster>
16
</resin>
17
​

This configures a third Resin instance that will load balance requests from the outside world back to the app-tier servers. Because the <resin:LoadBalance> tag is part of the Rewrite Dispatch architecture, you can route load balanced requests with custom dispatch rules.

Like This Refcard? Read More From DZone

related article thumbnail

DZone Article

What is a Servlet Container?
related article thumbnail

DZone Article

Memory Leak Protection in Tomcat 7
related article thumbnail

DZone Article

Why is Tomcat a Webserver and not an Application Server?
related article thumbnail

DZone Article

Scaling Azure Microservices for Holiday Peak Traffic Using Automated CI/CD Pipelines and Cost Optimization
related refcard thumbnail

Free DZone Refcard

GraphQL Essentials
related refcard thumbnail

Free DZone Refcard

API Integration Patterns
related refcard thumbnail

Free DZone Refcard

Getting Started With Cross-Platform Heterogeneous Computing
related refcard thumbnail

Free DZone Refcard

Introduction to Digital Asset Management via APIs

ABOUT US

  • About DZone
  • Support and feedback
  • Community research
  • Sitemap

ADVERTISE

  • Advertise with DZone

CONTRIBUTE ON DZONE

  • Article Submission Guidelines
  • Become a Contributor
  • Core Program
  • Visit the Writers' Zone

LEGAL

  • Terms of Service
  • Privacy Policy

CONTACT US

  • 3343 Perimeter Hill Drive
  • Suite 100
  • Nashville, TN 37211
  • support@dzone.com

Let's be friends: