All About Selectors
Just in case you've not read Core CSS: Part I, I'll briefly review the purpose of a CSS selector. A selector in a style sheet signals the browser to find matches within those markup (HTML, XHTML, XML) documents to which the style sheet is related.
There are more than a few selectors available for use (Table 1), but even intermediate and advanced CSS authors don't always have an opportunity to use some of them, largely due to crossbrowser support issues for a given selector. Core CSS: Part II will cover CSS 2.0/2.1 selectors. Where a selector is unavailable in contemporary Web browsers, a caution will be provided to alert you to any support concerns.
| Version | Date |
|---|---|
| Element | Selects by matching element |
| Class | Selects by matching class name |
| ID | Selects by matching id name |
| Pseudo Class | Selects by matching predefined pseudo class |
| Descendent (also known as "contextual") | Selects by descendant elements |
| Child | Selects by first-level (child) elements |
| Adjacent Sibling | Selects by matching sibling element |
| Attribute | Selects by matching attribute names and values |
| Pseudo Elements | Selects by matching predefined pseudo element |
Table 1. CSS Selectors Covered in this Refcard
To assist in visualizing how these selectors actually match, for each example you'll see an element, the corresponding CSS, and a document tree that visualizes what is selected within a sample document. Also provided are some use examples.

There's also a universal selector, *, which when used will select every single element within a document. It's used in several hacks, including the infamous "star html" hack, which is problematic and invalid. While the universal selector is important to know about, it's probably not going to be something you use too often in real-world scenarios.
Element Selectors
Element selectors, also referred to as "type" selectors, select by matching elements. They are very broad in scope. For example, if I have a million documents with many more millions of h2 elements within them, by using an element selector I can single handedly apply styles to all of those h2 elements using one rule. Element selectors are supported in all CSS browsers and are very widely used for these reasons.
Here's a CSS rule using an element selector:
h2 {color: #f00; font-family: Garamond; font-size:22px; font-variant: small-caps;}In the corresponding markup document(s), all h2s are selected and the style is applied (Figure 1).
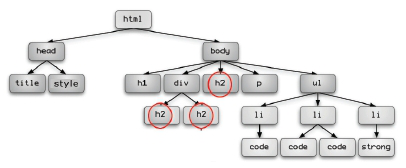
Figure 1. An HTML document tree showing that each of the h2s in the document has been selected.
Class Selectors
Class selectors are extremely useful selectors that allow authors to add a class attribute to a given element in the markup, with a custom value. Then using that value preceded by a dot, write a corresponding rule using the class name.
An example of an element with an added class attribute in the markup document would be:
<p class="warning">Any paragraph in any document onany page containing this class will have the classrules apply.</p>In the CSS:
.warning {color: red; font-weight: bold;}Figure 2 shows how this class, as written, will apply to both elements with the class attribute named "warning".
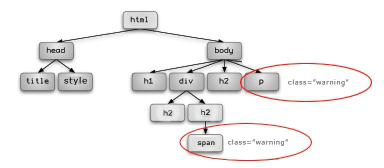
Figure 2. Selecting all elements with a class of warning.

You can limit a class to a specific element by placing the element selector before the class: p.warning. If you were to do this, only the paragraph will take on the class styles. Any other, non-conflicting styles that exist for the element p will also be sorted and included.
Multi-Classing
An interesting and occasionally useful technique is multi-classing. This means using more than one class to get the style you're after. A good use scenario would be a portal site in which you have multiple modules that have common colors and features, but require different background images. Consider the following style rules:
.module1 {width: 200px; margin: 5px; border:1px solid blue;}.weather {background-image: url(images/'sunshine.jpg');}To multiclass, I'd simply add both classes to the module element, with each name separated by a space:
<div class="module1 weather"> . . . </div>The element will now pick up the styles of both classes. Typically, use of 2-3 class names can be helpful within context, but it's not a practice I'd recommend using without a strong sense of your site hierarchy and management.
It's also important to point out that the source order of the class names in the markup document is of no consequence. However, if there are conflicts between the classes, sort order and specificity rules in CSS will calculate which rule takes precedence.

Avoid underscores and other special characters in class and ID names. The best practice currently is to use hyphenation: nav-main (not nav_main). Also, while camelCasing is extremely useful to coders, it can add a layer of extra testing because CSS requires case-matching, so case within the markup documents and any associated CSS must match for rules to apply.
ID Selectors
ID selectors are meant to identify a discrete portion of a document. This means an ID name can be used exactly one time in a given document. This is why ID's are particularly useful in CSS layout when identifying significant portions of the document, such as "content" "nav" or "site-info",because they are unique, discrete pieces of the document structure. Assuming only one document, here's a right/wrong comparison:
Right:
<div id="content"> . . . </div><div id="sub-content"> . . . </div>Wrong:
<div id="content"> . . . </div><div id="content"> . . . </div>In the style sheet ID selectors are written using the hash "#" (also known as an "octothorpe" for the word geeks among you) preceding a custom name.
#content {width: 500px; border: 1px solid #fff;}Figure 3 shows how this will now select the div with the unique id attribute named "content".
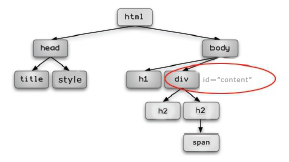
Figure 3. Using ID selectors to identify the content area. The id name can only be used once per document, but many times within a site.

While ID and Class names are in fact customized to suit your needs, it's considered best practice to avoid presentational names such as .redfont or #sidebar. What happens when the boss says "update all the red fonts on the site to be blue?" Easy enough to change the style in moments and update all those fonts, but now the markup documents are littered with class="redfont" when the actual visual result is blue! To avoid confusion of this nature, use naming that is descriptive (referred to as semantic naming) and where possible, consider creating conventions to be used site-wide.
Pseudo Class Selectors
A pseudo class selector is a set of predefined class-like selectors. Pseudo class selectors are written with a colon followed by the predefined pseudo class name. Pseudo classes can then be attached to a variety of elements in order to achieve a given result. It's likely you've used pseudo classes as much as element, ID, and class selectors, for a number of them are integral to styling links (Table 2).
| Selector | Purpose | Example |
|---|---|---|
| :link | Selects links that have not been visited | a:link {color: blue;} |
| :visited | Selects links that have been visited | a:visited (color: violet;} |
| :hover | Selects an element as the mouse passes over. | a:hover {color: #ccc;} |
| :focus | Selects the element that has focus | a:focus {background-color: orange;} |
| :active | Selects a link that is being activated | a:active {color: red;} |
| :first-child | Selects an element's first child | div:first-child {font-style: italic;} |
| :lang | Selects by matching human language | html:lang (de) {font-size: 80%;} |
Table 2. Pseudo Class Selectors
Note that :hover, :focus and :active are all referred to as "dynamic pseudo classes" because along with presentation they also allow for dynamic behavior, such as creating interesting looks for navigation, assisting with usability, and styling form controls. An example would be (Figure 4).
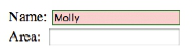
Figure 4. The form control that has focus (in this case the text input box associated with "Name") takes on the style you see here using the :focus selector on the input element.
Child Selectors
Child selectors are created by combining a parent element with the > combinator and a child element. This allows you to style only the child element or elements of the parent, without having those styles inherit down the tree. It's also a great way to reduce the use of class attributes, which help make managing sites all the more easy. Consider Figure 5.
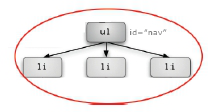
Figure 5. An unordered list element (parent) with three list item child elements.
Here, we have a parent element, ul, and we want to style each of the three list items below. The CSS rule would simply be:
ul>li {border: 0; margin 0; padding: 0;}Now all the children of any ul will have 0 border, margin and padding. Because in this example, the ul has an ID, we can use that to limit this rule only to that discrete document element:
ul#nav > li {border: 0; margin 0; padding: 0;}Not only has this limited the rule to the ul with an id of "nav", but it has also made the rule more specific both literally and technically. Also, you'll note that there's no white space surrounding the combinator in the first example, whereas in the second, there is. Either way is acceptable according to the spec.
You can use as many children within the selector as is required. In a scenario such as Figure 6, you could write a very specific selector to select only the children of the nested ordered list item and style it with a leading zero decimal.
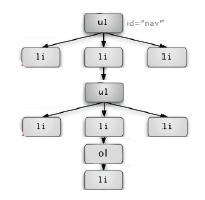
Figure 6. Tree depicting a nested ordered list within a nested unordered list with a parent unordered list. Using Child selectors, we can select children by following their ancestral path.
The resulting CSS would be:
ul#nav > li > ul > li > ol > li {list-style-type:decimal-leading-zero;}Descendent Selectors
Descendent selectors, as with Child selectors, begin with an element that has descendents. The combinator for descendents is a space. Since children are descendents, we can re-examine the same parent-child relationship we first did when examining child selectors (Figure 7).
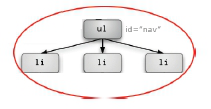
Figure 7. Children are also descendents.
If I wanted to set a style for any descendent list items within an unordered list using a descendent selector, I can do so as follows:
ul#nav li {list-style-type: none;}The differences is that not only the li children of the ul will be styled, but all li descendants of that ul and the ol will get the same style as well since all list items descend from the original unordered list (Figure 8).
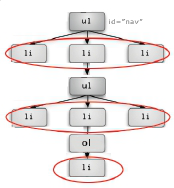
Figure 8. Descendent selectors select all descendents of the defined parent element, in this case, nested unordered lists. Note that the list item that is child to the ordered list element will also receive the style, for it too is a descendent of the original parent list.
As with child selectors, we can create strings to reach a particular element within the tree:
ul#nav li ul li ol li {list-style-type: decimalleading-zero;}The selector will now select the very last list item in Figure 8, which is the child of the ordered list item element in the tree hierarchy. None of the other list items will take on this rule.
Fortunately, Descendent selectors are widely supported in current CSS browsers including IE 6.0 and later.
Adjacent Sibling Selectors
An Adjacent Sibling selector allows you to select an element based on its nearest sibling element. Consider the following markup:
<div><h1>Main Content Header</h1><p>First paragraph</p><p>Second paragraph</p><p>Third paragraph</p></div>It's a common design theme to style a first paragraph somewhat differently using a larger font, or emphasized font, bringing the reader's eye to the critical introductory material. Using an Adjacent sibling selector, we can do this quite easily without using a class attribute on the first paragraph. The combinator for the Adjacent sibling selector is the plus sign, +.
h1+p {font-weight: bold;}This selects the first adjacent paragraph element (Figure 9), with no change to any of the other siblings.
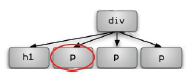
Figure 9. Selecting a sibling using Adjacent sibling selectors.
You can use multiple sibling elements to reach a given sibling. Let's say you wanted to select not the first but the third paragraph in the example and have it display as italic.
The syntax would be:
h1+p+p+p {font-style: italic;}Figure 10 shows the selection.
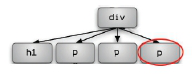
Figure 10. Selecting a further removed sibling using a string of adjacent siblings.
Attribute Selectors
Attribute selectors are a curious piece of selectors because they really are more akin to programmatic pattern matching than presentational design needs. There are four Attribute selectors that are available in CSS 2.1 (Table 3).
| Attribute Selector | Pattern Matching | Example |
|---|---|---|
| [name] | Selects by presence of attribute name for a given element | a[title] {font-style: italic;} |
| [name+value] | Selects by presence of the attribute name plus its value | img[src='photo.jpg'] |
| [name~="value"] | Selects by the attribute name plus the presence of a specific space separated word within the attribute value | img[alt~="Portland"] |
| [name|="value"] | Selects by the attribute name plus the presence of a hyphenated word within the attribute value | a[title|="top-down"] |
Table 3. Attribute Selectors
To select by attribute name...
Compare the following two links:
<a href=http://molly.com/" title="go to Molly's Website">Molly.Com, Inc.</a><a href="http://molly.com/">Molly.Com, Inc.</a>In the first link, there's a title attribute. Using the following CSS:
a[title] {font-style: italic;}We can style any anchor elements with a title attribute present, but the style will not apply where no title attribute is present (Figure 11).

Figure 11. Applying style using an attribute name selector.
To select by attribute name and value...
Consider the following two HTML image elements:
<img src='images/photo.jpg'><img src='images/screenshot.jpg'>To add a specific style to the first instance, you can use the following syntax:
img[src='photo.jpg'] {border: 2px solid #000;}
The selector will match only an image element with an attribute of src='images/photo.jpg' and no other image elements will be selected (Figure 12).
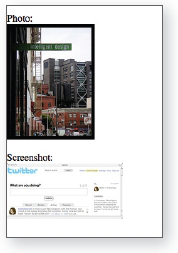
Figure 12. Applying a border to only the photo using the complete (name+value) attribute selector.
To select by presence of multiple space separators and hyphens...
Consider the following XHTML image elements:
<img src='images/vacation01.jpg' alt="Portlandvacation photo" /><img src="images/vacation04.jpg" alt="vacation photo" /><img src="images/vaction03.jpg" alt="vacation photo ofPortland" />To add style to only those images that have an alt attribute (and all your images should!), and a series of space separated words that include "Portland" (note that the case must match as well) you'd use the following syntax:
img[alt~="Portland"] {border: 5px solid green;}Figure 13 shows the results.
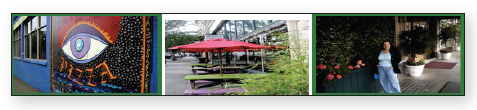
Figure 13. Applying a border to only the photos with multiple space separated words where "Portland" appears within the image's alternative text string.
Similarly, you can select by the presence of an attribute name plus a hyphenated, specified word within the value. Consider the following HTML:
<p title="nursery-rhyme">Mary, Mary, quite contrary,how does your garden grow?</p><p title="song-lyric">And she's buying a Stairway toHeaven</p><p title="traditional-rhyme">Roses are red, violetsare blue</p>Add this CSS rule:
p[title="rhyme"] {color: blue;}|Both the first and third elements will take the style, whereas the middle one will not. (Figure 14).
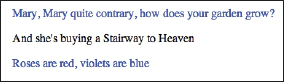
Figure 14. Applying style using pattern matching. Note however that in the case of hyphen matching, order matters. The hyphenated word must be first in the string. Had we switched the third paragraph's attribute to title="rhyme-traditional" the style should not apply.
Pseudo Elements
As with pseudo classes, pseudo elements are predefined elements within CSS. There are four of which to be aware, as described in Table 4.
| Pseudo Element | Purpose | Example |
|---|---|---|
| :first-line | Selects only the first line of text in a given element. | blockquote:first-line {font-weight: bold;} |
| :first-letter | Selects only the first letter of text in a given element | p:first-letter {font-size: 250%} |
| :before | Used to generate content before a given element | q:before {content: open-quote;} |
| :after | Used to generate content after a given element | q:after {content: close-quote} |
Table 4. Pseudo Elements in CSS 2.1
First line and letter pseudo elements
Both the :first-line and :first-letter pseudo elements are typically used to add typographic features to a given set of text. The following HTML block shows what happens in the document:
<p>Let's be honest. We all make mistakes. Sometimeswe can be too hard on ourselves, or others, for thosemistakes. It makes me remember that long ago and faraway, someone very wise said:</p><blockquote>To err is human, to forgive divine.</blockquote><p>Having both the capacity to be forgiving of othersand the ability to forgive yourself is part oflearning how to be wise.</p>Using the decorative pseudo elements, here are the CSS examples from Table 4:
blockquote:first-letter {font-size: 250%}p:first-line {font-weight: bold;}Figure 15 shows the results.
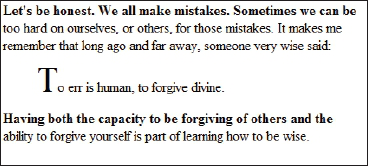
Figure 15. Using first letter and line pseudo elements to apply style. Notice that in the case of :first-line, the "line" is defined as whatever amount of characters make up the first line. Because this is not always the desired result, using min-width and max-width properties to limit line length wherever possible can address this issue.
Both the first letter and line pseudo elements have good support across browsers, including IE 6.0.
Generated Content
A fascinating if controversial portion of CSS is called generated content. This is when, using the pseudo elements :before and/or :after, you as the author can actually generate text, symbols and images. What's more, you can style them on the page. Consider the quote from earlier:
<blockquote>To err is human, to forgive divine.</blockquote>Now, let's generate quote marks and style them using CSS:
blockquote {font-size: 30px; font-weight: bold;}blockquote:before {content: open-quote; color: red;font-size: 120px;}blockquote:after {content: close-quote; color: red;font-size: 120px;}Figure 16 shows the results in Firefox.

Figure 16. Using pseudo elements to generate and style the quote marks.
The caveat, and the cause of misuse and therefore controversy has to do with the fact that the content generated by pseudo elements results in pseudo content. In practical terms, this means the content never actually appears in the content layer, only the presentational layer!
In a situation where the generated content is largely decorative or practical in some sense but does not inhibit access to important data, this is fine. Take a look at the generated source by Firefox and you'll see the quotes called for do not appear in the code at all.
But what if we were to generate the message itself? In the HTML:
<blockquote></blockquote>And in the CSS:
blockquote:after {content: "To err is human, to forgive divine" font-size: 90px;}Figure 17 shows the generated results.

Figure 17. You can generate actual content, but it will only appear on the presentational surface.
However, when we look at the source code, we see that the generated content does not appear within the code (Figure 18).
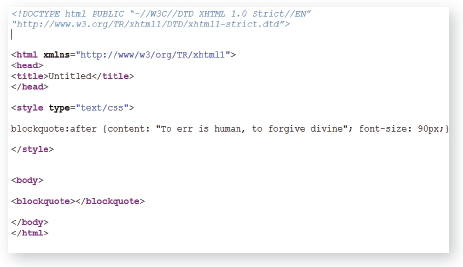
Figure 18. While we can visually see the generated content on the screen, it does not appear within the actual body of the document.
Therefore, if you are generating important content to the desktop screen that must be comprehensible, generated content is not the way to go. It can cause problems for copying, printing, reading, saving, and for anyone using Internet Explorer IE7 or earlier, simply non-existent due to complete lack of implementation for the :before and :after pseudo elements.
