DZone
Thanks for visiting DZone today,
Edit Profile
  • Manage Email Subscriptions
  • How to Post to DZone
  • Article Submission Guidelines
Sign Out View Profile
  • Post an Article
  • Manage My Drafts
Over 2 million developers have joined DZone.
Log In / Join
Please enter at least three characters to search
Refcards Trend Reports
Events Video Library
Refcards
Trend Reports

Events

View Events Video Library

Zones

Culture and Methodologies Agile Career Development Methodologies Team Management
Data Engineering AI/ML Big Data Data Databases IoT
Software Design and Architecture Cloud Architecture Containers Integration Microservices Performance Security
Coding Frameworks Java JavaScript Languages Tools
Testing, Deployment, and Maintenance Deployment DevOps and CI/CD Maintenance Monitoring and Observability Testing, Tools, and Frameworks
Culture and Methodologies
Agile Career Development Methodologies Team Management
Data Engineering
AI/ML Big Data Data Databases IoT
Software Design and Architecture
Cloud Architecture Containers Integration Microservices Performance Security
Coding
Frameworks Java JavaScript Languages Tools
Testing, Deployment, and Maintenance
Deployment DevOps and CI/CD Maintenance Monitoring and Observability Testing, Tools, and Frameworks

Modernize your data layer. Learn how to design cloud-native database architectures to meet the evolving demands of AI and GenAI workkloads.

Secure your stack and shape the future! Help dev teams across the globe navigate their software supply chain security challenges.

Releasing software shouldn't be stressful or risky. Learn how to leverage progressive delivery techniques to ensure safer deployments.

Avoid machine learning mistakes and boost model performance! Discover key ML patterns, anti-patterns, data strategies, and more.

  1. DZone
  2. Refcards
  3. Continuous Integration: Servers and Tools
refcard cover
Refcard #087

Continuous Integration: Servers and Tools

Learning to Utilize DevOps with Servers and Tools

Follow this walkthrough of Continuous Integration that uses Hudson as an example. A must-have for all those working with CI.

Download Refcard
Free PDF for Easy Reference
refcard cover

Written By

author avatar Khary Mendez
Senior Principal Consultant, Red Hat
author avatar Paul Duvall
CTO and co-founder, Stelligent
Table of Contents
► About Continuous Integration and DevOps ► CI Tooling ► The Demo CI Pipeline ► Using the CI Server Docker-Formatted Container Image ► Manually Installing the CI Server Tools ► Configuring a CI Pipeline ► The Pipeline Definition ► Testing the CI pipeline ► Tools
Section 1

About Continuous Integration and DevOps

Continuous Integration is one of several core concepts that must be considered when implementing a DevOps culture within an organization. The core principles of a DevOps implementation are summarized by what Gene Kim describes as "The Three Ways".[1] The First way is to move towards systems thinking - that is evaluating the performance of the system as a whole. This usually involves organizational changes at a cultural level.

The second way, and what we will be focusing on here, involves amplifying feedback loops. The Second Way is about creating the right to left feedback loops. The goal of almost any process improvement initiative is to shorten and amplify feedback loops so necessary corrections can be continually made.

The outcomes of the Second Way include understanding and responding to all customers, internal and external, shortening and amplifying all feedback loops, and embedding knowledge where we need it.

— Gene Kim The Three Ways: The Principles Underpinning DevOps

Continuous integration helps to fulfill this second principle. The continuous review, build, and inspection of software allows us to address potential issues as soon as possible. It also promotes transparency as all team members have access to the analytical artifacts produced by the system.

Section 2

CI Tooling

There are many tools that can be used to implement a continuous integration system. For the purposes of this reference card we will be focusing on the following:

Tool Description
Apache Mave n 3.3.3 Apache Maven is A software project management and comprehension tool. Based on the concept of a project object model (POM), Maven can manage a project’s build, reporting and documentation from a central piece of information.
Git 2.5.5 A version control system that is widely used for software development and other version control tasks. It is a distributed revision control system with an emphasis on speed, data integrity, and support for distributed, non-linear workflows.
Jenkins 2.0 Jenkins is an open source automation server with an unparalleled plugin ecosystem to support practically every tool as part of your delivery pipelines. Whether your goal is continuous integration, continuous delivery or something else entirely, Jenkins can help automate it. Jenkins 2.0 provides built-in support for delivery pipelines, improved usability and full backwards compatibility.
SonarQube 5 .5 An open platform for managing code quality, including static code analysis.
Gerrit 2.12 .x Provides web based code review and repository management for the Git version control system.
SonaType Ne xus 3.0.x A repository for Java artifacts (e.g., JAR and WAR files). Version 3 provides additional support for docker-formatted container images, NPM (node package manager), Bower (HTML, CSS, Javascript repository), and NuGet (Microsoft .NET package manager)
Section 3

The Demo CI Pipeline

A graphical representation of the CI pipeline is available at https://raw.githubusercontent.com/kharyam/dzone-ci-demo-app/master/images/ci-pipeline-overview.png The pipeline consists of the following steps:

  1. Developer clones code from the authoritative Git repository managed by Gerrit

  2. Developer pushes a code change into the pending changes repository managed by Gerrit
  3. The team lead reviews the code change in pending changes repository
  4. The team lead approves the code changes in the pending changes repository
  5. The team lead submits the code changes into the authoritative Git repository
  6. Gerrit triggers the Jenkins CI pipeline via a change-merged Git hook.
  7. The Checkout stage of the pipeline is run
  8. The Checkout stage clones the source code from the authoritative git repository
  9. The Build stage performs a maven build of the code
  10. The Analyze stage calls SonarQube to perform static code analysis
  11. The Archive stage uploads the WAR file into the Nexus repository. It also archives unit test results within Jenkins
  12. The Deploy to Development stage deploys the WAR from Nexus into the development servers *
  13. Upon authorized approval the Deploy to Test stage deploys the WAR into the test servers *
  14. Upon authorized approval the Deploy to Production stage deploys the WAR into the production servers *

*Note that the last three steps are considered part of the Continuous Deployment (CD) process, however this can also be handled by the Jenkins pipeline. These steps are simply placeholders that can be implemented if CD is desired.

There are two options for continuing with this reference card. The tools can be installed manually following the section Manually Installing the CI Server Tools or you can use an example docker-formatted container image, described in the section Using the CI Server docker-formatted Container Image

Section 4

Using the CI Server Docker-Formatted Container Image

A docker-formatted container image was created for the configuration described in this reference card. See https://hub.docker.com/r/kharyam/ciserver/

For more background information on Docker refer to the Getting Started with Docker Refcard (https://dzone.com/storage/assets/572027-rc221-docker.pdf)

Use the following steps to run the container image. 1. Pull the container image

docker pull kharyam/ciserver

  1. Start the container image

 *$ docker run -d -p 8081-8084:8081-8084 -p 29418:29418 -p 40396:40396 --name=ciserver kharyam/ciserver:latesta75ac65d97ad5c.... (1)* 

1 This is the ID of the container started by the docker engine

The initial login to Jenkins will require a password printed when Jenkins initially comes up. You can issue the following command to obtain this password.

 *$ docker logs ciserver 2>&1 | grep -A1 "Please use"

Please use the following password to proceed to installation: 4a9bb0ea09cb4f21aa8d9fc506661a80 (1)* 

1 Use this password for the initial Jenkins login described in the section Install and Configure Jenkins

Continue with the section Manually Installing the CI Server Tools, skipping the steps noted as unnecessary for container images.

Section 5

Manually Installing the CI Server Tools

Here we describe how to install and configure the above tools on a linux server. Once completed you will be able to test out a continuous integration flow. These steps were tested on Fedora 23 but may be easily tweaked for other linux distributions.

Note The configuration described herein is for demonstration / learning purposes and not meant for production use. For example, we will be using embedded databases for Gerrit and SonarQube while in production you would use a dedicated database such as PostgreSql or MySQL.

Choose a location to install the software and configuration information for the CI server, for example /opt/ciserver. We will refer to this location as $CI_HOME

Install and Configure Java, Maven and Git

Note You can skip this section if using the container image

Note If you are using Red Hat Enterprise Linux or CentOS, replace the dnf command with yum

  1. Install Java, maven, and git:

$ sudo dnf install java-1.8.0-openjdk-devel maven git gitweb*

Install and Configure Nexus

Note You can skip to Step 4 if using the container image. Nexus may take several minutes to start the first time.

  1. Download Nexus 3.0.x http://www.sonatype.com/download-oss-sonatype
  2. Extract the archive:

$ tar -xf nexus-3.0.0-03-unix.tar.gz -C $CI_HOME*

Note By default Nexus will run on port 8081. This can be changed by updating $CI_HOME/nexus-3.0.0-03/etc/org.sonatype.nexus.cfg

  1. Start Nexus using the default configuration:

$ cd $CI_HOME/nexus-3.0.0-03/bin $ ./nexus start Starting Nexus*

  1. Open your browser to http://localhost:8081 and you should see the Nexus welcome screen. Sign in as admin with the password admin123
  2. You can change the admin user password by clicking the Admin user name in the header menu then selecting Change password

Now we will create a new role in Nexus that has the ability to administer the release and snapshot repositories. 1. Click the gear icon then select Roles under the Security section on the left of the screen and click the Create Role → Nexus Role button

  1. Enter the following values:Role ID: nx-mvn-adminRole Name: Nexus Maven AdminPrivileges: nx-repository-admin-maven2-maven-releases-* , nx-repository-admin-maven2-maven-snapshots-*, nx-repository-view-maven2-maven-releases-*, nx-repository-view-maven2-maven-snapshots-*
  2. Click the Create Role button

Next we will create a Jenkins user account that will allow our CI pipeline to upload artifacts into the Nexus Repository 1. Click the gear icon then select Users under the Security section on the left of the screen and click the Create User button

  1. Enter the following values:
Field Value
ID jenkins
First Name Jenkins
Last Name Deployer
Email jenkins@nowhere.com
Password jenkins123
Confirm password jenkins123
Status Active
Roles Nexus Maven Admin


    1. Click the Create User button
  • Install and Configure Gerrit

    Note You can skip this section if using the container image

    1. Download Gerrit 2.12.x - https://Gerrit-releases.storage.googleapis.com/index.html
    2. Place the WAR file in $CI_HOME
    3. Initialize Gerrit:

    $ java -jar Gerrit.war init --batch -d $CI_HOME/Gerrit*

    1. Add the following to the end of $CI_HOME/Gerrit/etc/Gerrit.config:

    [gitweb] cgi = /var/www/git/gitweb.cgi*

    1. Change the port Gerrit runs on from 8080 to 8082. Edit $CI_HOME/Gerrit/etc/Gerrit.config and replace all occurrences of 8080 with 8082
    2. Change the authentication type from OPENID to DEVELOPMENT_BECOME_ANY_ACCOUNT. Edit $CI_HOME/Gerrit/etc/Gerrit.config and replace all occurrences of OPENID with DEVELOPMENT_BECOME_ANY_ACCOUNT

    Note Gerrit supports many authentication schemes including OPENID and LDAP. For our demonstration purposes we will enable a simple developmental authentication scheme, not meant for use in production. Refer to https://Gerrit-review.googlesource.com/Documentation/config-Gerrit.html#auth for more information on Gerrit’s authentication support.

    1. Download the latest bouncy castle security JAR from here https://www.bouncycastle.org/latest_releases.html
    2. Copy the JAR file to $CI_HOME/Gerrit/lib
    3. Restart Gerrit

    $ $CI_HOME/Gerrit/bin/Gerrit.sh restart*

    1. You should now be able to access the Gerrit home page via http://localhost:8082

    Install and Configure SonarQube

    Note You can skip this section if using the container image. Just note the default username is admin, with password admin

    1. Download SonarQube - http://www.sonarqube.org/downloads/

    $ unzip sonarqube-5.5.zip -d $CI_HOMEsonar.web.port=8084 $ echo "sonar.web.port=8084" >> $CI_HOME/sonarqube-5.5/conf/sonar.properties $ cd $CI_HOME/sonarqube-5.5/bin/linux-x86-64 $ ./sonar.sh start*

    1. You should now be able to log in to the web console by pointing your browser to http://localhost:8084 Sign in as admin with the password admin

    Install and Configure Jenkins

    Note You can skip to Step 3 if using the container image

    1. Download Jenkins - https://Jenkins.io/2.0/

    $ mv Jenkins.war $CI_HOME*

    1. Startup Jenkins on port 8083 and make a note of the admin password:

     $ java -jar Jenkins.war --httpPort=8083 *... Jenkins initial setup is required. An admin user has been created and a password generated. Please use the following password to proceed to installation:

    112233445566778899aabbccddeeff11 (1)

    ...* 

    1 The initial Jenkins password

    1. Log in to Jenkins via http://localhost:8083 using the password noted above. If you are using the container image, use the password that was provided via the docker logs command.
    2. Select the Install suggested plugins option
    3. Complete the requested information to create the admin account. Use the username admin and password admin. Click Save and finish then click Start using Jenkins
    4. You should now be presented with the main Jenkins page

    You can now proceed to Configuring a CI pipeline

    Section 6

    Configuring a CI Pipeline

    Configure Gerrit

    We are going to create two user accounts in Gerrit. One representing a development team lead and another representing a developer. 1. Connect to Gerrit via http://localhost:8082/login

    1. Select the New Account button under the Register heading
    2. Enter Team Lead for the full name and click the Save Changes button
    3. Enter teamlead for the username and click the Select Username button (Click ok to confirm)
    4. Paste the ssh public key that you use for Git (e.g., ~/.ssh/id_rsa.pub) into the Add SSH Public Key text box and click the Add button
    5. If you are using the container image, you can generate an ssh key pair by following these steps:
    6. Log in to your container

    $ docker exec -it ciserver /bin/bash*

    1. Generate a key pair

    $ ssh-keygen Generating public/private rsa key pair. Enter file in which to save the key (/opt/ci-server/.ssh/id_rsa): **(1)** Created directory '/opt/ci-server/.ssh'. Enter passphrase (empty for no passphrase): **(1)** Enter same passphrase again: **(1)** Your identification has been saved in /opt/ci-server/.ssh/id_rsa. Your public key has been saved in /opt/ci-server/.ssh/id_rsa.pub. The key fingerprint is: SHA256:ApTkVs+jY/N85pLY4WTKOJ1n2SOojs7B8Fi6F4/wsOg ci-server@2cdd3e3d74de The keys randomart image is: +---[RSA 2048]----+ | .o.. | | o.. | | + + | | . . . . | |. . * S | | | |+=++ + Xo=o | | | |oE+.oo o o.. | +----[SHA256]-----+*

    1 Press enter when prompted

    1. Copy the public key that was created in /opt/ci-server/.ssh/id_rsa.pub
    2. Click the Continue link on the bottom of the page. Since this is the first user we have created in Gerrit, the user is automatically granted administrator privileges.
    3. Go back to http://localhost:8082/login and Select the New Account button under the Register heading again
    4. Enter Team Developer for the full name and click the Save Changes button
    5. Enter teamdeveloper for the username and click the Select Username button (Click ok to confirm)
    6. Click the Register New Email.. button, enter the email address that you have (or will have) in your .gitconfig. Click Register
    7. Paste the ssh public key that you use for Git (e.g., ~/.ssh/id_rsa.pub) into the Add SSH Public Key text box and click the Add button. Use the same public key as was used for the team lead user.
    8. Click the Continue link on the bottom of the page.

    Configure Maven for SonarQube

    Note You can skip this section if using the container image

    Make a backup copy of /usr/share/maven/conf/settings.xml and use the following instead. If you are using the container image this file is already in place.

    ​x
    1
    <?xml version="1.0" encoding="UTF-8"?>
    2
    <settings>
    3
    ​
    4
      <servers>
    5
        <server> (1)
    6
          <id>internal.repo</id>
    7
          <username>jenkins</username>
    8
          <password>jenkins123</password>
    9
        </server>
    10
      </servers>
    11
    ​
    12
      <pluginGroups> (2)
    13
        <pluginGroup>org.sonarsource.scanner.maven</pluginGroup>
    14
      </pluginGroups>
    15
      <profiles>
    16
        <profile>
    17
          <id>sonar</id>
    18
          <activation>
    19
            <activeByDefault>true</activeByDefault>
    20
          </activation>
    21
          <properties>
    22
            <sonar.host.url>
    23
              http://localhost:8084 (3)
    24
            </sonar.host.url>
    25
          </properties>
    26
        </profile>
    27
      </profiles>
    28
    </settings>

    1 Credentials for pushing artifacts into Nexus. Note Maven also supports password encryption - http://maven.apache.org/guides/mini/guide-encryption.html
    2 Sonar plugin for static code analysis
    3 URL of the sonar server

    Configure Jenkins

    Note You will need to run through these steps even if you are using the container image.

    Configure Maven

    1. Return to the Jenkins console (http://localhost:8083) and login as admin

    1. Click the Manage Jenkins link on the left
    2. Click Global Tool Configuration
    3. At the very bottom, click Add Maven. For the name specify M3. Deselect Install automatically and set the value of MAVEN_HOME to /usr/share/maven
    4. Click the Save button at the bottom of the page.

    Install Additional Plugins

    1. On the Manage Jenkins page, select Manage Plugins

    1. Click the Available tab and type sonarqube in the search filter.
    2. Select the check box next to SonarQube Plugin and click the Install without restart button
    3. Repeat the previous steps to install the Sidebar Link plugin by specifying sidebar link in the search filter

    Set JAVA_HOME

    1. Navigate to Manage Jenkins → Configure System

    1. Under Global Properties select Environment Variables
    2. Enter JAVA_HOME for the name and /usr/lib/jvm/java-1.8.0 as the value
    3. Click the Save button at the bottom of the page

    Add links to SonarQube, Nexus and Gerrit (optional)

    These steps will create links on the main Jenkins page to the Nexus, Gerrit and SonarQube pages. 1. Navigate to Manage Jenkins → Configure System

    1. Under Additional Sidebar Links enter the following information:

    Field

    Value

    Link URL

    http://localhost:8084

    Link Text

    SonarQube

    Link Icon

    gear.png


    1. Click the Add Link button and enter the following values for Nexus
    Field

    Value

    Link URL

    http://localhost:8081

    Link Text

    Nexus

    Link Icon

    gear.png


    1. Click the Add Link button and enter the following values for Gerrit

    Field

    Value

    Link URL

    http://localhost:8082

    Link Text

    Gerrit

    Link Icon

    gear.png


    1. Click the Save button at the bottom of the screen
  • Push code to Gerrit

    These directions will refer to $GIT_HOME as the directory where you store your git projects, for example ~/git. With these steps we will create a new project in Gerrit, seeding it with source code from an existing GitHub repository.

    Note If you are using the container image, you can perform these steps within the container. Log in to the container and create a git directory within the home directory mkdir ~/git && cd ~/git

    1. Clone the demo application (https://github.com/kharyam/dzone-ci-demo-app) from GitHub and remove the .git directory

    $ cd $GIT_HOME $ git clone https://github.com/kharyam/dzone-ci-demo-app.git $ rm -fr $GIT_HOME/dzone-ci-demo-app/*.git

    1. Create a new project named Demo in Gerrit as the teamlead user

    $ ssh -p 29418 teamlead@localhost gerrit create-project Demo --empty-commit*

    1. Clone the new project as the teamdeveloper user 
    $ cd $GIT_HOME
    $ git clone ssh://teamdeveloper@localhost:29418/Demo.git
    1. Move the files from the github project into the Gerrit project

    $ mv $GIT_HOME/dzone-ci-demo-app/* $GIT_HOME/Demo $ mv $GIT_HOME/dzone-ci-demo-app/.gitignore $GIT_HOME/*Demo

    1. Install the Gerrit Git commit hook. This hook will append a change-id to the commit message, which is required by Gerrit. For more information see https://Gerrit-review.googlesource.com/Documentation/user-changeid.html

    $ cd $GIT_HOME/Demo $ gitdir=$(git rev-parse --git-dir); scp -p -P 29418 teamdeveloper@localhost:hooks/commit-msg ${gitdir}/h*ooks/

    1. Commit and push the code to Gerrit

    Note If you are running this within the container, run the following commands first:

    19
    1
    $ git config --global user.name "teamdeveloper"
    2
    ​
    3
    $ git config --global user.email "email@somewhere.com" (1)
    4
    $ cd $GIT_HOME/Demo
    5
    $ git add . (1)
    6
    $ git commit -am "Initial commit" (2)
    7
    $ git push origin HEAD:refs/for/master (3)
    8
    ​
    9
    Counting objects: 20, done.
    10
    Delta compression using up to 8 threads.
    11
    Compressing objects: 100% (11/11), done.
    12
    Writing objects: 100% (20/20), 3.32 KiB | 0 bytes/s, done.
    13
    Total 20 (delta 0), reused 0 (delta 0)
    14
    remote: Processing changes: new: 1, refs: 1, done
    15
    remote:
    16
    remote: New Changes:
    17
    remote:   http://localhost:8082/6 Initial commit
    18
    remote:
    19
    To ssh://teamdeveloper@localhost:29418/Demo.git

    1 Recursively stage all files into the local Git repository 2 Commit all newly added / modified files into the local Git repository 3 Push the commit into the remote Gerrit repository. HEAD:refs/for/master is a special Git reference used by Gerrit to stage changes for review prior to making them available on the authoritative Git repository.

    1. Now if you navigate to the Open Reviews in Gerrit (http://localhost:8082/#/q/status:open) you will see the pending review for this initial commit.

    Create the Jenkins Project

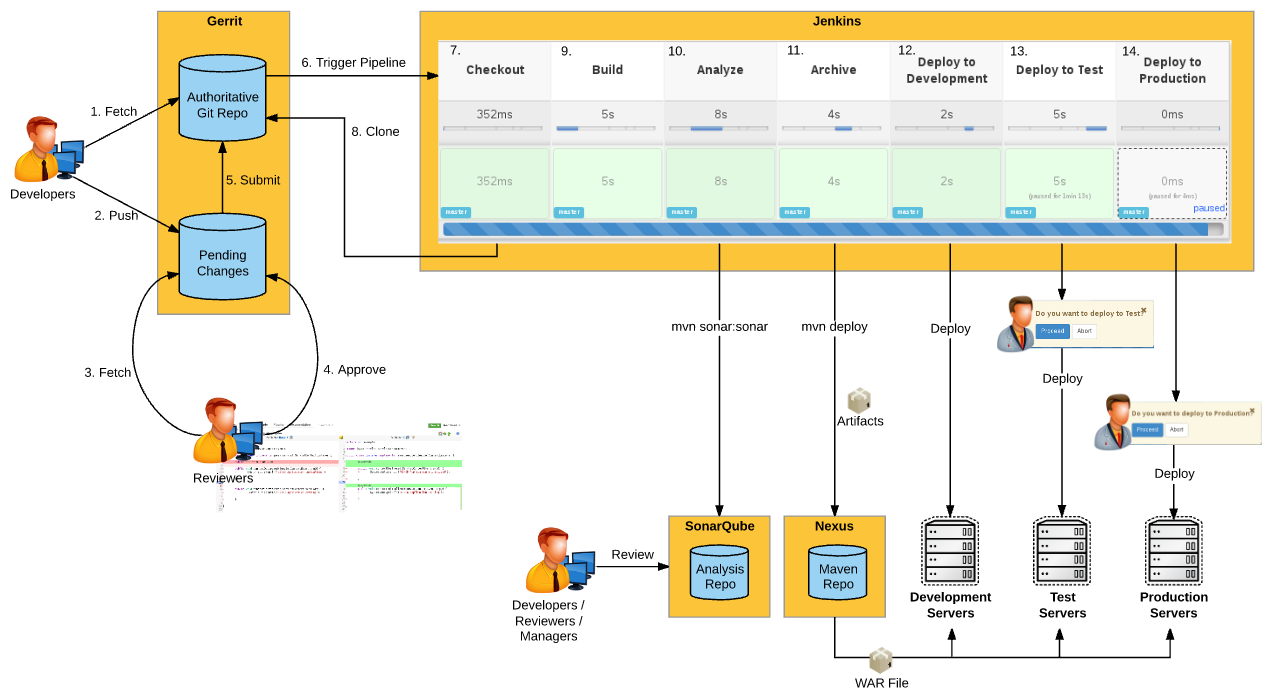
    Here we will create a new Jenkins project that will deploy our Continuous Integration Pipeline. The Pipeline itself is defined in the Jenkinsfile of our sample project.

    1. Login to the Jenkins console (http://localhost:8083/) as the admin user

    1. Click the New Item link
    2. Enter a project name of CI Demo, Select the Pipeline option then click the OK button
    3. Under Build Triggers select Trigger builds remotely (e.g., from scripts). For the Authentication Token enter super_secret_build_token

    Note This will allow us to trigger a build by performing an HTTP get on the URL http://localhost:8083/job/CI%20Demo/build?token=super_secret_build_token We will use this to create a Git hook in Gerrit that will trigger a Jenkins build when code has been successfully peer reviewed.

    1. In the Pipeline section, set the Definition to Pipeline script from SCM
    2. Set the SCM to Git and enter the URL of the Gerrit repository - http://localhost:8082/p/Demo.git
    3. Click the Save button
    Section 7

    The Pipeline Definition

    To learn more about the Jenkins Pipeline plugin (formerly known as the Jenkins Workflow plugin), refer to https://dzone.com/refcardz/continuous-delivery-with-Jenkins-workflow

    60
    1
    node { (1)
    2
       // Mark the code checkout 'stage'....
    3
       stage 'Checkout' (2)
    4
    ​
    5
       // Get the latest code from Gerrit
    6
       git url: 'http://localhost:8082/p/Demo.git' (3)
    7
    ​
    8
       // Get the maven tool.
    9
       def mvnHome = tool 'M3' (4)
    10
    ​
    11
       stage 'Build'
    12
    ​
    13
       // Update the version in the pom to match the Jenkins build number. (5)
    14
       sh "${mvnHome}/bin/mvn versions:set -DnewVersion=${env.BUILD_NUMBER} -DallowSnapshots=true"
    15
    ​
    16
       // Run the maven build
    17
       sh "${mvnHome}/bin/mvn clean package"
    18
    ​
    19
       stage 'Analyze'
    20
       sh "${mvnHome}/bin/mvn sonar:sonar" (6)
    21
    ​
    22
       stage 'Archive'
    23
    ​
    24
       // Archive the artifacts in Jenkins (7)
    25
       step([$class: 'ArtifactArchiver', artifacts: '**/target/*.jar,**/target/*.war', fingerprint: true])
    26
    ​
    27
       // Archive the test results. (8)
    28
       step([$class: 'JUnitResultArchiver', testResults: '**/target/surefire-reports/TEST-*.xml'])
    29
    ​
    30
       // Deploy the artifacts to Nexus (9)
    31
       sh "${mvnHome}/bin/mvn deploy"
    32
    ​
    33
    ​
    34
       stage concurrency:1, name: 'Deploy to Development' (10)
    35
       echo 'Simulating deployment to Development Environment'
    36
       echo "Downloading WAR file from http://localhost:8081/repository/maven-releases/org/example/cisampleapp/${env.BUILD_NUMBER}/cisampleapp-${env.BUILD_NUMBER}.war"
    37
       echo 'Deploying WAR file to development server(s)'
    38
       sleep 2
    39
    ​
    40
    ​
    41
       stage concurrency:1, name: 'Deploy to Test'
    42
       timeout(time: 7, unit: 'DAYS') { (11)
    43
         input message: 'Do you want to deploy to Test?', submitter: 'admin' (12)
    44
        }
    45
       echo 'Simulating deployment to Test Environment'
    46
       echo "Downloading WAR file from http://localhost:8081/repository/maven-releases/org/example/cisampleapp/${env.BUILD_NUMBER}/cisampleapp-${env.BUILD_NUMBER}.war"
    47
       echo 'Deploying WAR file to Test server(s)'
    48
       sleep 5
    49
    ​
    50
    ​
    51
       stage concurrency:1, name: 'Deploy to Production'
    52
       timeout(time: 7, unit: 'DAYS') {
    53
         input message: 'Do you want to deploy to Production?', submitter: 'admin'
    54
        }
    55
       echo 'Simulating deployment to Production Environment'
    56
       echo "Downloading WAR file from http://localhost:8081/repository/maven-releases/org/example/cisampleapp/${env.BUILD_NUMBER}/cisampleapp-${env.BUILD_NUMBER}.war"
    57
       echo 'Deploying WAR file to production server(s)'
    58
       sleep 5
    59
    ​
    60
    }

    1 The node specifies that the contained steps will run on a Jenkins node. Optionally a node label can be specified to restrict the steps to run a specific node.
    2 Defining the first stage in the pipeline, named Checkout.
    3 Checkout the source code from our Git repository.
    4 Define the location of the Maven command line, from our previously configured M3 definition in the Jenkins configuration.
    5 Prior to running the build, use the maven set:versions command to update the version in our POM file with the Jenkins build number. This gives will give us code traceability back to the Jenkins build.
    6 Run the sonar plugin to perform static code analysis.
    7 Archive the built JARs and WARs within Jenkins. Record fingerprints for traceability.
    8 Archive the unit test results to enable the generation of trends.
    9 Issue the Maven deploy command to upload our artifacts (POM and WAR file) into Nexus. It will be versioned by the Jenkins build number as set by the Maven set:versions command.
    10 Simulate an automatic deployment to the development servers. concurrency:1 indicates that if there are multiple instances of this pipeline running only one may run this stage at a time. The WAR file would be downloaded from Nexus and deployed to application servers in the development environment.
    11 Simulate a deployment to the test environment.
    12 The input message will prompt before deploying into the specified environment. The submitter option specifies a user or group allowed to execute the step. In this case only the admin user can deploy to test or production.

    Create the Git Hook in Gerrit

    Note You can skip this section if you are using the container image

    We will create a hook in Gerrit that will automatically start our Jenkins pipeline when code has been successfully peer reviewed and submitted into the authoritative Git repository managed by Gerrit. Note that it assumes the Jenkins login is admin/admin and the project name is CI Demo

    Note We are using Gerrit to manage code review and promotion however other techniques and tools can be incorporated as well. An example would be the use of the Git flow workflow http://nvie.com/posts/a-successful-git-branching-model/

    For more information on the change-merged Gerrit hook refer to https://review.typo3.org/Documentation/config-hooks.html#_change_merged

    9
    1
    *\$ mkdir \${CI\_HOME}/gerrit/hooks
    2
    \$ printf '\#!/bin/sh
    3
    if \[ \$8 == \\"Demo\\" \]; then
    4
    curl -u admin:admin
    5
    http://localhost:8083/job/CI%%20Demo/build\\?token=super\_secret\_build\_token
    6
    &gt; /tmp/results.txt
    7
    fi ' &gt; \${CI\_HOME}/gerrit/hooks/change-merged
    8
    ​
    9
    \$ chmod 555 \${CI\_HOME}/gerrit/hooks/change-merged*
    Section 8

    Testing the CI pipeline

    Approve the Initial Code Checkin within Gerrit

    1. Log in to gerrit (http://http://localhost:8082/login) as the Team Lead user

    1. Select All → Open. There will be a pending peer review labeled Initial commit
    2. Click the Initial commit link

    1 This section lists all files that are modified and need to be removed as part of the review. Clicking a file in the list will reveal a diff from the previous version of the file. The diff screen also allows comments to be placed on lines of a file.
    2 Reply… allows a reviewer to submit overall feedback on a set of changes.
    3 The default behavior of Gerrit requires that at least one person of sufficient privilege give a vote of +2 in order for a change to be eligible for submission into the authoritative Git repository. This button provides a quick means of doing so.

    1. Select the Reply… button
    2. Enter a textual description and choose the +2 option so that the code can be submitted into the authoritative repository. Click the Post button.
    3. Note that a Submit button is now available. This will place the change into the authoritative repository. Open a browser tab to the Jenkins CI Demo project (http://localhost:8083/job/CI%20Demo/)
    4. Now click the Submit button in Gerrit and switch back to the Jenkins tab. A new build should start shortly, since our change-merged hook will be called by Gerrit
    5. If you hover the mouse over the Deploy to Test stage, you will be prompted to deploy to the test environment. Since the pipeline only allows the admin user to deploy, we can click the Proceed button. Repeat for Production.

    View the Nexus and SonarQube results

    Verify the WAR file was uploaded into Nexus:

    1. Login to Nexus via http://localhost:8081/ using admin/admin123

    1. Select Browse → Components → maven-releases

    cisampleapp should be visible with its corresponding version number. Click it and you should see the WAR, pom and their corresponding checksums in the repository.

    View the SonarQube analysis results

    1. Login to SonarQube via http://localhost:8084/ using admin/admin

    1. The cisample application should be visible, click it
    2. Under Code Smells notice the rating of C
    3. Click the C then click the Listener.java source file
    4. Expand each item in the source code to reveal the code smells
    5. Explore other areas of the SonarQube interface

    Update the code

    Here we resolve some of the code smells and exercise the pipeline once again 1. Update the Listener.java source file located in ${GIT_HOME}/Demo/src/main/java/org/example/Listener.java

    1. Remove the line public int thisIsBad = 0;
    2. Add the @Override annotation above each method
    17
    1
    package org.example;
    2
    ​
    3
    import javax.servlet.ServletContextEvent;
    4
    ​
    5
    public class Listener implements javax.servlet.ServletContextListener {
    6
    ​
    7
            @Override
    8
            public void contextDestroyed(ServletContextEvent arg0) {
    9
                    System.out.println("CI/CD Application initialized");
    10
    ​
    11
            }
    12
    ​
    13
            @Override
    14
            public void contextInitialized(ServletContextEvent arg0) {
    15
                    System.out.println("CI/CD Application exiting");
    16
    ​
    17
            }
    1. Commit and push the changes to Gerrit

    $ git commit -am "Resolved some SonarQube issues" $ git push origin HEAD:refs/for/master*

    Approve the code in Gerrit

    1. Log back in to Gerrit as the teamlead user

    1. A new open peer review is now listed
    2. Click the issue then click the file listing to view the diff
    3. Comments can be added to the diff by clicking the line number in one of the margins
    4. Click the browser back button to return to the previous screen
    5. Click the Code-Review+2 button to approve the change
    6. Click the Submit button to submit the change into the authoritative Git repository. Verify another build has started in Jenkins.

    Verify SonarQube has fewer issues

    1. Log in to SonarQube and note the number of Code Smells has decreased from five to two

    The Third Way The Third Way is about creating a culture that fosters two things: continual experimentation, taking risks and learning from failure; and understanding that repetition and practice is the prerequisite to mastery.
    — Gene Kim The Three Ways: The Principles Underpinning DevOps

    Developers need to be able to rapidly create production-like environments to deploy and experiment with code and application changes. This capability, which enables the third way, is facilitated through Platform As a Service (PaaS) using tools such as Red Hat® OpenShift Container Platform (OCP) https://www.openshift.com/container-platform/

    Section 9

    Tools

    The following is a sampling of tools available to support your continuous integration effort.

    Tool Type Name
    CI/CD Server Jenkins/Hudson, Bamboo, TravisCI, GitLab CI
    Code Quality Static Analysis Findbugs, PMD, CheckStyle
    Automated Testing JUnit, Selenium, Cucumber
    Build Tools Maven, Gradle, Ant, Buildr, Rake
    Artifact Repository Nexus, Artifactory
    Code Quality Reporting and Aggregation SonarQube
    Version Control Git, Subversion, Mercurial
    Code Review Gerrit, Crucible, Git Lab, Phabricator

    1. The Three Ways: The Principles Underpinning DevOps, Gene Kim - http://itrevolution.com/the-three-ways-principles-underpinning-devops/

    Like This Refcard? Read More From DZone

    related article thumbnail

    DZone Article

    Getting Started With Jenkins: The Ultimate Guide
    related article thumbnail

    DZone Article

    How to Convert XLS to XLSX in Java
    related article thumbnail

    DZone Article

    Automatic Code Transformation With OpenRewrite
    related article thumbnail

    DZone Article

    Accelerating AI Inference With TensorRT
    related refcard thumbnail

    Free DZone Refcard

    Platform Engineering Essentials
    related refcard thumbnail

    Free DZone Refcard

    The Essentials of GitOps
    related refcard thumbnail

    Free DZone Refcard

    Continuous Integration Patterns and Anti-Patterns
    related refcard thumbnail

    Free DZone Refcard

    Getting Started With CI/CD Pipeline Security

    ABOUT US

    • About DZone
    • Support and feedback
    • Community research
    • Sitemap

    ADVERTISE

    • Advertise with DZone

    CONTRIBUTE ON DZONE

    • Article Submission Guidelines
    • Become a Contributor
    • Core Program
    • Visit the Writers' Zone

    LEGAL

    • Terms of Service
    • Privacy Policy

    CONTACT US

    • 3343 Perimeter Hill Drive
    • Suite 100
    • Nashville, TN 37211
    • support@dzone.com

    Let's be friends: