DZone
Thanks for visiting DZone today,
Edit Profile
  • Manage Email Subscriptions
  • How to Post to DZone
  • Article Submission Guidelines
Sign Out View Profile
  • Post an Article
  • Manage My Drafts
Over 2 million developers have joined DZone.
Log In / Join
Please enter at least three characters to search
Refcards Trend Reports
Events Video Library
Refcards
Trend Reports

Events

View Events Video Library

Zones

Culture and Methodologies Agile Career Development Methodologies Team Management
Data Engineering AI/ML Big Data Data Databases IoT
Software Design and Architecture Cloud Architecture Containers Integration Microservices Performance Security
Coding Frameworks Java JavaScript Languages Tools
Testing, Deployment, and Maintenance Deployment DevOps and CI/CD Maintenance Monitoring and Observability Testing, Tools, and Frameworks
Culture and Methodologies
Agile Career Development Methodologies Team Management
Data Engineering
AI/ML Big Data Data Databases IoT
Software Design and Architecture
Cloud Architecture Containers Integration Microservices Performance Security
Coding
Frameworks Java JavaScript Languages Tools
Testing, Deployment, and Maintenance
Deployment DevOps and CI/CD Maintenance Monitoring and Observability Testing, Tools, and Frameworks

Modernize your data layer. Learn how to design cloud-native database architectures to meet the evolving demands of AI and GenAI workkloads.

Secure your stack and shape the future! Help dev teams across the globe navigate their software supply chain security challenges.

Releasing software shouldn't be stressful or risky. Learn how to leverage progressive delivery techniques to ensure safer deployments.

Avoid machine learning mistakes and boost model performance! Discover key ML patterns, anti-patterns, data strategies, and more.

  1. DZone
  2. Refcards
  3. Angular Essentials
refcard cover
Refcard #206

Angular Essentials

This Refcard will teach you about the essential pieces of Angular and the main concepts behind working with this ever-growing platform for web-based applications through detailed diagrams, example code snippets, and in-depth explanations. You will learn about using TypeScript libraries, component classes, data binding mechanisms, and more.

Download Refcard
Free PDF for Easy Reference
refcard cover

Written By

author avatar Dhananjay Kumar
Developer Evangelist, Infragistics
author avatar Gil Fink
CEO and senior consultant, sparXys
Table of Contents
► How Is Angular Different From AngularJS? ► Angular’s Basic Architecture ► Setting Up the Environment ► Components ► Data Binding ► Component Communication ► Directives
Section 1

How Is Angular Different From AngularJS?

Angular is a widely used web application platform and framework created and maintained by Google. It serves as a total rewrite to AngularJS, and the “Angular” name is meant to include all versions of the framework starting from 2 and up.

TypeScript is the core of Angular, being the language upon which Angular is written. As such, Angular implements major and core functionalities as TypeScript libraries while building client applications with additional HTML.

For a variety of reasons, Angular has grown in popularity with developers. It lends itself to maintenance ease with its component and class-based system, modular building, hierarchical structure, and simple, declarative templates. Furthermore, its cross-platform capabilities are advantageous to enterprise and SMB developers, including its speed with server-side rendering.

This Refcard will go over the essential pieces of Angular and the main concepts behind working with the ever-growing platform for web-based applications.

In the past, you might have worked with or learned about AngularJS. There are a few main differences between the two that you need to know about:

  • Modularity: More of Angular’s core functionalities have moved to modules.
  • Hierarchy: Angular has an architecture built around a hierarchy of components.
  • Syntax: Angular has a different expression syntax for event and property binding.
  • Dynamic loading: Angular will load libraries into memory at run-time, retrieve and execute functions, and then unload the library from memory.
  • Iterative callbacks: Using RxJS, Angular makes it easier to compose asynchronous or callback-based code.
  • Asynchronous template compilation: Angular, without controllers and the concept of “scope,” makes it easier to pause template rendering and compile templates to generate the defined code.
  • TypeScript: Angular includes ES6 and its superset, TypeScript.
Section 2

Angular’s Basic Architecture

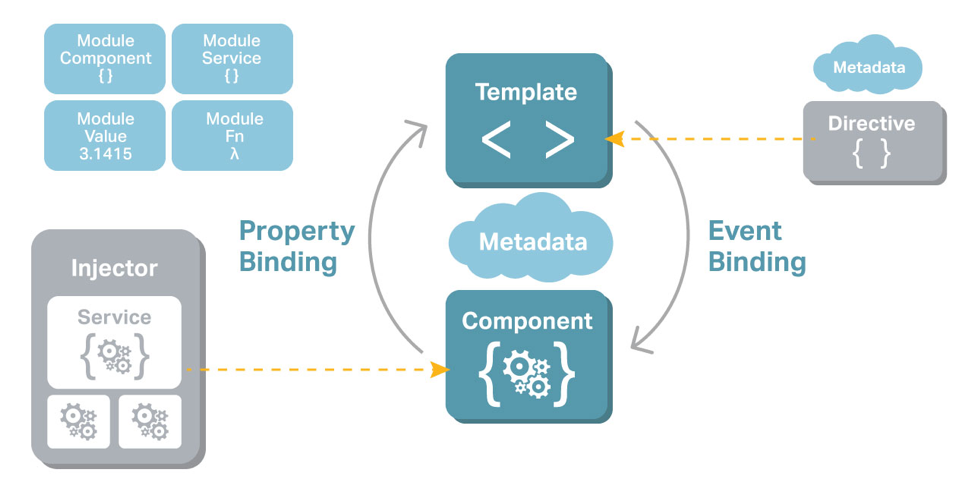
Here’s a brief overview of the architecture involved and the building blocks that I’ll cover in this piece:

  • NgModules: Declares a compilation context for a set of components that is dedicated to an application domain, a workflow, or a related set of capabilities.
  • Components: Defines a class that contains application data and logic and works with an HTML template that defines a view.
  • Template: Combines HTML with Angular markup that can modify HTML elements before they’re displayed.
  • Directive: Attaches custom behavior to elements in the DOM.
  • Two-way data binding: Coordinates the parts of a template with the parts of a component.
  • Services: Typically, a class used to increase modularity and reusability with a narrow and well-defined purpose.
  • Dependency injection: Provides components with needed services and gives access to a service class.
  • Routing: Defines a navigation path among the different application states lets you view application hierarchies.

This diagram best represents the relationship between the building blocks:

Image title

Section 3

Setting Up the Environment

In order to set up the environment, you should start by downloading Angular with the Angular CLI tool. If you have a machine that doesn’t have Node.js and npm installed, make sure to download and install them here.

Then, you’ll run a global install of the Angular CLI:

1
npm install --g \@angular/cli

NgModules

NgModules are excellent for organizing related items, and they function to configure both the injector and compiler. You’ll find that that the NgModule is named as such, since it’s a class that is marked by the @NgModule decorator.

This decorator had the information on how to compile a component’s template and how to create an injector at runtime, all within a metadata object. As you could guess, @NgModule serves to identify and bridge the gap between both its own directives, components, and pipes, and external components that rely on these pieces.

The exports property also makes some of the module’s make-up public, ensuring that the external components can effectively use them.

As a last bit, @NgModule also adds services providers to the application dependency injectors, foundationally making the application more adaptable.

Angular Bootstrapping

Understanding that an NgModule describes how an application’s parts are to work and fit together, it makes sense that every Angular application has at least one Angular module. This core module functions as the “root” module for the application, and the one that you would bootstrap to launch the application.

There are three basic components to the root module, which we’ll discuss briefly.

Declarations Array

Components used in an NgModule need to be added to the declarations array as a way to tell Angular that these specific components belong to this specific module. On top of this, since only declarables can be added to the declarations array, you’ll find that the array will be populated with various components, directives, and pipes.

Keep in mind that declarables can only belong to one module.

Imports Array

The Imports array contains all dependent modules.

Providers Array

The Providers array contains all Services dependencies.

Section 4

Components

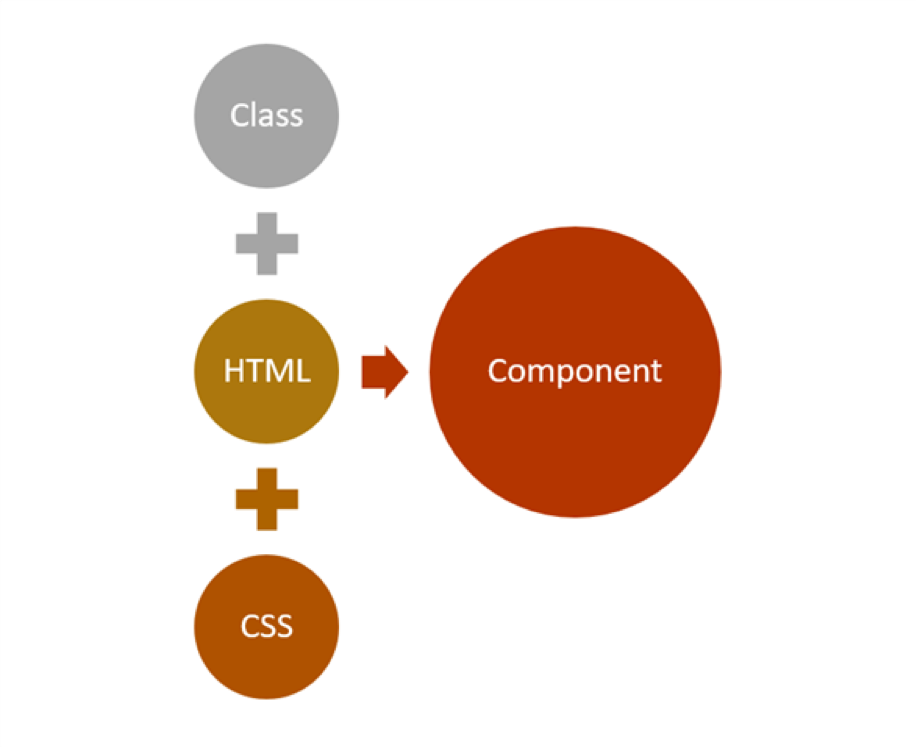
In Angular applications, what you see in the browser (or elsewhere) is a component. A component consists of the following parts:

  1. A TypeScript class called the Component class
  2. An HTML file called the template of the component
  3. An optional CSS file for the styling of the component

Image title

A component is a type of directive with its own template. Whatever you see in an Angular application is a component.

Creating a Component

You can use an Angular CLI command to generate a component as shown below:

1
1
ng generate component Product

This command will generate ProductComponent as shown below:

​x
1
import { Component, OnInit } from '@angular/core';
2
​
3
@Component({
4
  selector: 'app-product',
5
  templateUrl: './product.component.html',
6
  styleUrls: ['./product.component.scss']
7
})
8
export class ProductComponent implements OnInit {
9
​
10
  constructor() { }
11
​
12
  ngOnInit() {
13
  }
14
​
15
}

A component is a class decorated with the @Component decorator. There are mainly four steps to create a component:

  1. Create a class and export it. This class will contain data and the logic.
  2. Decorate the class with @component metadata. Metadata describes the component and sets the value for different properties.
  3. Import the required libraries and modules to create the component.
  4. Create a template of the component and optionally style of the component.

As you can see, the generated ProductComponent consists of:

  • A class to hold data and the logic.
  • HTML template and styles to display data in the app. It is also called a view and is seen by the user on the screen to interact.
  • Metadata that defines the behavior of a component. Component metadata is applied to the class using the @Component decorator. Different behavior of the component can be passed as properties of the object, which is an input parameter of the @Component decorator.

Component Metadata

The @Component decorator decorates a class as a component. It is a function that takes an object as a parameter. In the @Component decorator, we can set the values of different properties to set the behavior of the component. The most used properties are as follows:

  • template
  • templateUrl
  • Providers
  • styles
  • styleUrls
  • selector
  • encapsulation
  • changeDetection
  • animations
  • viewProviders

Apart from the above-mentioned properties, there are also other properties. Let’s look into these important properties one by one.

Template and TemplateUrl

A template is the part of the component that gets rendered on the page. We can create a template in two ways:

  1. Inline template: template property
  2. Template in an external file: templateUrl property

To create an inline template, the “tilt” is a symbol used to create multiple lines in the template. A single-line inline template can be created using either single quotes or double quotes. For the inline template, set the value of template property. A complex template can be created in an external HTML file and can be set using the templateUrl property.

Selector

A component can be used using the selector. In the above example, the selector property is set to <app-product>. We can use the component on the template of other components using its selector.

Styles and StyleUrls

A component can have its own styles or it can refer to various other external style sheets. To work with styles, @Component metadata has styles and styleUrls properties. We can create inline styles by setting the value of the styles property. We can set external style using styleUrls property.

Providers

To inject a service in a component, you pass that to the providers array. Component metadata has an array type property called the provider. In the providers, we pass a list of services being injected in the component. We will cover this in detail in further sections.

ChangeDetection

This property determines how the change detector will work for the component. We set the ChangeDetectionStrategy of the component in the property. There are two possible values:

  1. Default
  2. onPush

We will cover this property in detail in further sections.

Encapsulation

This property determines whether Angular will create a shadow DOM for a component. It determines the ViewEncapsulation mode of the component. There are four possible values:

  1. Emulated (this is the default)
  2. Native
  3. None
  4. ShadowDom

Template

When you generate a component using Angular CLI, by default, selector, templateUrl, and styleUrl properties are set. For ProductComponent, the template is in external HTML file product.component.html.

3
1
<p>
2
  product works!
3
</p>

You can pass data and capture events between the component class and its template using data binding. We will cover this in detail in further sections.

Using a Component

A component can be used inside an Angular application in various ways:

  1. As a root component.
  2. As a child component. We can use a component inside another Component.
  3. Navigate to a component using routing. In this case, the component will be loaded in RouterOutlet.
  4. Dynamically loading component using ComponentFactoryResolver.

The component must be part of a module. To use a component in a module, first import it and then pass it to declaration array of the module.

5
1
@NgModule({
2
    declarations: [
3
        AppComponent,
4
        ProductComponent
5
    ],
Section 5

Data Binding

In Angular, data binding determines how data will flow in between the component class and component template.

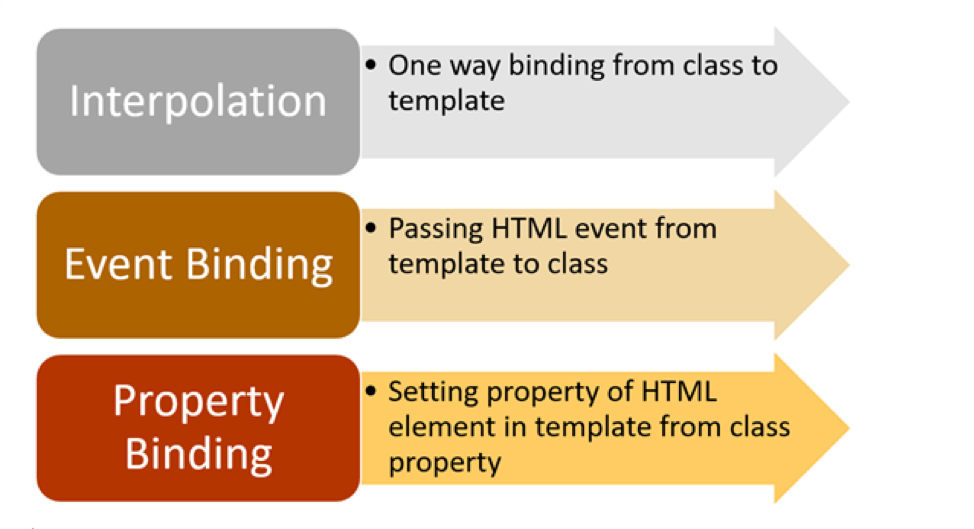
Angular provides us three types of data bindings:

  1. Interpolation
  2. Property binding
  3. Event binding

Image title

Interpolation

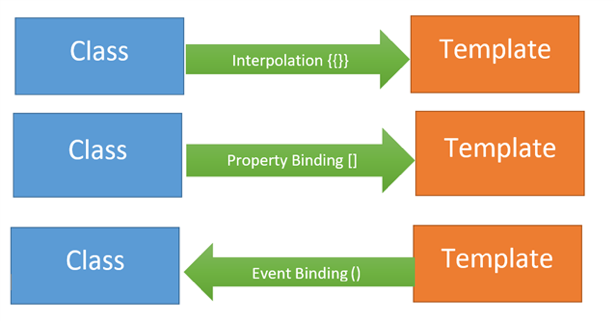
Angular interpolation is one-way data binding. It is used to pass data from the component class to the template. The syntax of interpolation is {{propertyname}}.

Let’s say that we have component class as shown below:

8
1
export class AppComponent {
2
​
3
      product = {
4
          title: 'Cricket Bat',
5
          price: 500
6
      };
7
​
8
  }

We need to pass the product from the component class to the template. Keep in mind that to keep the example simple, we’re hard-coding the value of the product object; however, in a real scenario, data could be fetched from the database using the API. We can display the value of the product object using interpolation, as shown in the listing below:

3
1
   <h1>Product</h1>
2
 <h2>Title : {{product.title}}</h2>
3
 <h2>Price : {{product.price}}</h2>

Using interpolation, data is passed from the component class to the template. Ideally, whenever the value of the product object is changed, the template will be updated with the updated value of the product object.

In Angular, there is something called the change detector service that makes sure that the value of the property in the component class and the template are in sync with each other.

Therefore, if you want to display data in Angular, you should use interpolation data binding.

Property Binding

Angular provides you with a second type of binding called property binding. The syntax of property binding is the square bracket: []. It allows for setting the property of HTML elements on a template with the property from the component class.

So, let’s say that you have a component class like the one below:

5
1
export class AppComponent {
2
​
3
       btnHeight = 100;
4
       btnWidth = 100;
5
   }

Now, you can set the height and width properties of a button on a template with the properties of the component class using property binding.

5
1
<button 
2
  [style.height.px] = 'btnHeight'
3
    [style.width.px] = 'btnWidth' >
4
        Add Product
5
</button>

Angular property binding is used to set the property of HTML elements with the properties of the component class. You can also set properties of other HTML elements like image, list, table, etc. Whenever the property’s value in the component class changes, the HTML element property will be updated in the property binding.

Event Binding

Angular provides you with a third type of binding to capture events raised on templates in a component class. For instance, there’s a button on the component template that allows you to call a function in the component class. You can do this using event binding. The syntax behind event binding is (eventname).

For this example, you might have a component class like this:

7
1
export class AppComponent {
2
​
3
     addProduct() {
4
         console.log('add product');
5
     }
6
​
7
 }

You want to call the addProduct function on the click of a button on the template. You can do this using event binding:

4
1
<h1>Product</h1>
2
<button (click)='addProduct()'>
3
    Add Product
4
</button>

Angular provides you these three bindings. In event binding, data flows from template to class and in property binding and interpolation, data flows from class to template.

Image title

Two-Way Data Binding

Angular does not have built-in two-way data binding; however, by combining property binding and event binding, you can achieve two-way data binding.

Image title

Angular provides us a directive, ngModel, to achieve two-way data binding, and it’s very easy to use. First, import FormsModule, and then you can create two-way data binding:

4
1
export class AppComponent {
2
​
3
     name = 'foo';
4
 }

We can two-way data-bind the name property with an input box:

3
1
<input type="text" [(ngModel)]='name' />
2
​
3
<h2>{{name}}</h2>

As you see, we are using [(ngModel)] to create two-way data-binding between input control and name property. Whenever a user changes the value of the input box, the name property will be updated and vice versa.

Section 6

Component Communication

In Angular, components communicate to each other to share data such as object, string, number, array, or HTML.

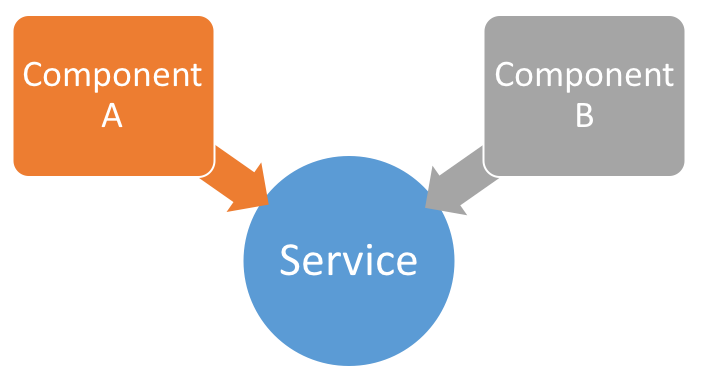
To understand component communication, first, we need to understand relationship between components. For example, when two components are not related to each other, they communicate through an Angular service.
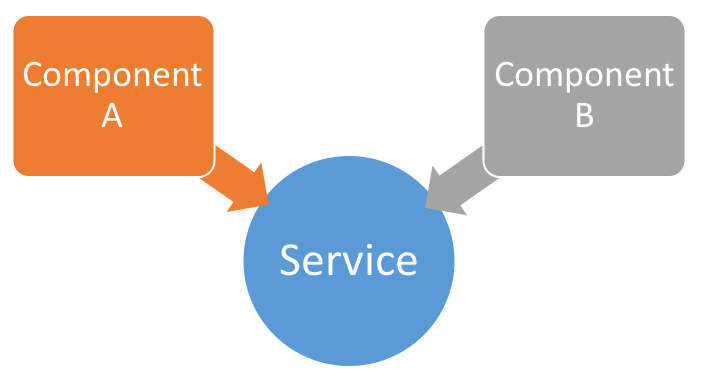
Image title

When you use a component inside another component, you create a component hierarchy. The component being used inside another component is known as the child component and the enclosing component is known as the parent component. As shown in the image below, in context of AppComponent, app-child is a child component and AppComponent is a parent component.

14
1
import { Component } from '@angular/core';
2
​
3
@Component({
4
  selector: 'app-root',
5
  template: `
6
  <h1>Hello {{message}}</h1>
7
  <app-child></app-child> //child component
8
  `,
9
})
10
export class AppComponent { //parent component
11
​
12
  message = 'I am Parent';
13
​
14
}

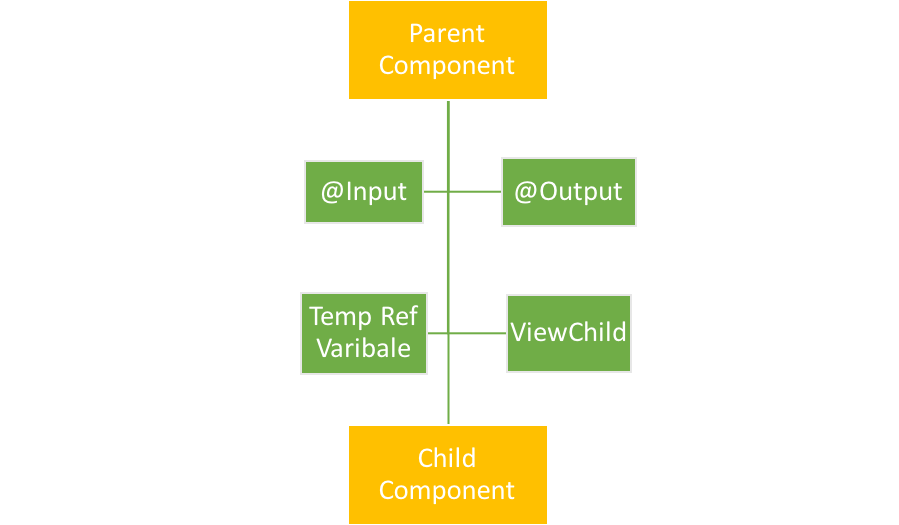
Parent and child components can communicate to each other in following ways:

  • @Input()
  • @Output()
  • Temp Ref Variable
  • ViewChild
  • ContentChild

Image title

When components are not related to each other, they communicate using services. Otherwise, they communicate using one of the various options depending on the communication criteria. Let’s explore all the options one by one.

@Input

You can pass data from a parent component to a child component using the @Input decorator. Data could be of any form such as the primitive type’s string, number, object, array, etc.

Image title

To understand use of @Input, let’s create a component:

11
1
import { Component } from '@angular/core';
2
​
3
@Component({
4
    selector: 'app-child',
5
    template: `<h2>Hi {{greetMessage}}</h2>`
6
})
7
export class AppChildComponent {
8
​
9
    greetMessage = 'I am Child';
10
​
11
}

Use the AppChild component inside AppComponent:

10
1
@Component({
2
  selector: 'app-root',
3
  template: `
4
  <h1>Hello {{message}}</h1>
5
  <app-child></app-child>
6
  `,
7
})
8
export class AppComponent {
9
  message = 'I am Parent';
10
}

AppComponent is using AppChildComponent, so AppComponent is the parent component and AppChildComponent is the child component. To pass data, the @Input decorator uses the child component properties. To do this, we’ll need to modify child AppChildComponent as shown in the listing below:

15
1
import { Component, Input, OnInit } from '@angular/core';
2
​
3
@Component({
4
    selector: 'app-child',
5
    template: `<h2>Hi {{greetMessage}}</h2>`
6
})
7
export class AppChildComponent implements OnInit {
8
    @Input() greetMessage: string;
9
    constructor() {
10
​
11
    }
12
    ngOnInit() {
13
​
14
    }
15
}

As you notice, we have modified the greetMessage property with the @Input() decorator. So essentially, in the child component, we have decorated the greetMessage property with the @Input() decorator so that value of the greetMessage property can be set from the parent component. Next, let’s modify the parent component AppComponent to pass data to the child component.

15
1
import { Component } from '@angular/core';
2
​
3
@Component({
4
  selector: 'app-root',
5
  template: `
6
  <h1>Hello {{message}}</h1>
7
  <appchild [greetMessage]="childmessage"></appchild>
8
  `,
9
})
10
export class AppComponent {
11
​
12
  message = 'I am Parent';
13
  childmessage = 'I am passed from Parent to child component';
14
​
15
}

From the parent component, we are setting the value of the child component’s property greetMessage. To pass a value to the child component, we need to pass the child component property inside a square bracket and set its value to any property of the parent component. We are passing the value of the childmessage property from the parent component to the greetMessage property of the child component.

@Output

You can emit the event from the child component to the parent component using the @Output decorator.

Image title

Temp Ref Variable

Angular is based on a one-directional data flow and does not have two-way data binding. So, we use @Output in a component to emit an event to another component. Let’s modify AppChildComponent as shown in the listing below:

13
1
import { Component, Input, EventEmitter, Output } from '@angular/core';
2
​
3
@Component({
4
    selector: 'app-child',
5
    template: `<button (click)="handleclick()">Click me</button> `
6
})
7
export class AppChildComponent {
8
​
9
    handleclick() {
10
​
11
        console.log('hey I am  clicked in child');
12
    }
13
}

There is a button in the AppChildComponent template calling the function handleclick. Let’s use the app-child component inside the AppComponent as shown in the listing below:

9
1
import { Component, OnInit } from '@angular/core';
2
@Component({
3
    selector: 'app-root',
4
    template: `<app-child></app-child>`
5
})
6
export class AppComponent implements OnInit {
7
    ngOnInit() {
8
    }
9
}

Here, we’re using AppChildComponent inside AppComponent, thereby creating a parent/child kind of relationship in which AppComponent is the parent and AppChildComponent is the child. When we run the application, we’ll see this message in the browser console:
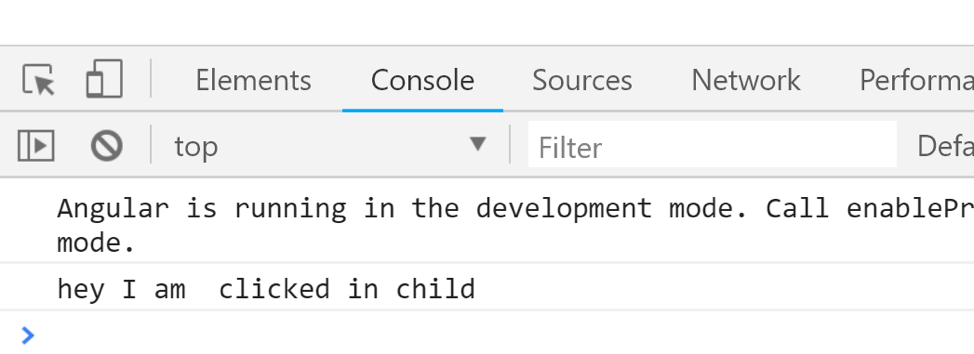
Image title

So far, it’s very simple to use event binding to get the button to call the function in the component. Now, let’s tweak the requirement a bit. What if you want to execute a function of AppComponent on the click event of a button inside AppChildComponent?

To do this, you will have to emit the button-click event from AppChildComponent. Import EventEmitter and output from @angular/core.

Here, we are going to emit an event and pass a parameter to the event. Modify AppChildComponent as shown in next code listing:

14
1
import { Component, EventEmitter, Output } from '@angular/core';
2
@Component({
3
    selector: 'app-child',
4
    template: `<button (click)="valueChanged()">Click me</button> `
5
})
6
export class AppChildComponent {
7
    @Output() valueChange = new EventEmitter();
8
    counter = 0;
9
    valueChanged() {
10
​
11
        this.counter = this.counter + 1;
12
        this.valueChange.emit(this.counter);
13
    }
14
}

We performed the following tasks in the AppChildComponent class:

  • Created a variable called counter that will be passed as the parameter of the emitted event.
  • Created an EventEmitter valueChange that will be emitted to the parent component.
  • Created a function named valueChanged(). This function is called on the click event of the button, and inside the function, the event valueChange is emitted.
  • While emitting the valueChange event, the value of the counter is passed as a parameter.

In the parent component AppComponent, the child component AppChildComponent can be used as shown in the listing below:

12
1
import { Component, OnInit } from '@angular/core';
2
@Component({
3
    selector: 'app-root',
4
    template: `<app-child (valueChange)='displayCounter($event)'></app-child>`
5
})
6
export class AppComponent implements OnInit {
7
    ngOnInit() {
8
    }
9
    displayCounter(count) {
10
        console.log(count);
11
    }
12
}

Right now, we are performing the following tasks in the AppComponent class:

  • Using <app-child> in the template.
  • In the <app-child> element, using event binding to use the valueChange event.
  • Calling the displayCounter function on the valueChange event.
  • In the displayCounter function, printing the value of the counter passed from the AppChildComponent.

As you can see, the function of AppComponent is called upon the click event of the button placed on the AppChildComponent. This is can be done with @Output and EventEmitter. When you run the application and click the button, you can see the value of the counter in the browser console. Each time you click on the button, the counter value is increased by 1.
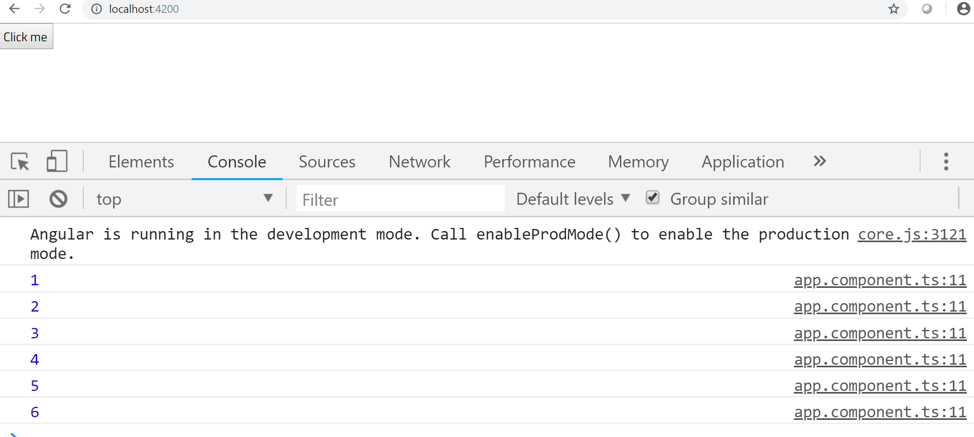
Image title

Section 7

Directives

Directives create DOM elements and change their structure or behavior in an Angular application. There are three types of directives in Angular:

  1. Components: Directives with templates.
  2. Attribute directives: Change appearance and behavior of an element, component, or other directive.
  3. Structural directives: Change DOM layout by adding or removing elements.

The basic difference between a component and a directive is that a component has a template, whereas an attribute or structural directive does not have a template. Angular has provided us many inbuilt structural and attribute directives. Inbuilt structural directives are *ngFor and *ngIf. Attribute directives are NgStyle and NgModel.

Using Structural Directives

*ngIf is a structure directive used to provide an “if” condition to the statements to get executed. If the expression evaluates to a False value, the elements are removed from the DOM, whereas if it evaluates to True, the element is added to the DOM.

Consider the below listing. In this, the *ngIf directive will add div in DOM if the value of showMessage property is True.

12
1
@Component({
2
  selector: 'app-message',
3
  template:`
4
  <div *ngIf = 'showMessage'>
5
    Show Message 
6
  </div>
7
  `
8
})
9
export class AppMessageComponent {
10
​
11
        showMessage  = true;
12
  }

Keep in mind that *ngIf does not hide or show a DOM element. Rather, it adds or removes depending on the condition.

The *ngFor structure directive creates DOM elements in a loop. Consider the below listing. In this, the *ngFor directive will add rows in a table depending on number of items in the data array.

17
1
@Component({
2
  selector: 'app-message',
3
  template:`
4
  <table>
5
   <tr *ngFor='let f of data'>
6
   <td>{{f.name}}</td>
7
   </tr>
8
  </table>
9
  `
10
})
11
export class AppMessageComponent {
12
​
13
        data = [
14
          {name : 'foo'},
15
          {name: 'koo'}
16
        ];
17
  }

In most cases, you won’t have to create custom structural directives; built-in directives should be enough.

Like This Refcard? Read More From DZone

related article thumbnail

DZone Article

Login Page Using Angular Material Design
related article thumbnail

DZone Article

How to Convert XLS to XLSX in Java
related article thumbnail

DZone Article

Automatic Code Transformation With OpenRewrite
related article thumbnail

DZone Article

Accelerating AI Inference With TensorRT
related refcard thumbnail

Free DZone Refcard

Getting Started With Low-Code Development
related refcard thumbnail

Free DZone Refcard

JavaScript Test Automation Frameworks
related refcard thumbnail

Free DZone Refcard

Salesforce Application Design
related refcard thumbnail

Free DZone Refcard

E-Commerce Development Essentials

ABOUT US

  • About DZone
  • Support and feedback
  • Community research
  • Sitemap

ADVERTISE

  • Advertise with DZone

CONTRIBUTE ON DZONE

  • Article Submission Guidelines
  • Become a Contributor
  • Core Program
  • Visit the Writers' Zone

LEGAL

  • Terms of Service
  • Privacy Policy

CONTACT US

  • 3343 Perimeter Hill Drive
  • Suite 100
  • Nashville, TN 37211
  • support@dzone.com

Let's be friends: